
 The C100’s AVCHD is a little odd – you may see ‘ghost interlace’ around strong colours in PsF video. AVCHD is 4:2:0 – the resolution of the colour is a quarter of the resolution of the base image. Normally, our eyes aren’t so bothered about this, and most of the time nobody’s going to notice. However, stronger colours found in scenes common to event videographers, and when ‘amplifying’ colours during grading, all draw attention to this artifact.
Note that this problem is completely separate from the ‘Malign PsF’ problem discussed in another post, but as the C100 is the only camera that generates this particular problem in its internal recordings, I suspect that this is where the issue lies. I’ve never seen this in Panasonic or Sony implementations of AVCHD.
This is a 200% frame of some strongly coloured (but natural) objects, note the peculiar pattern along the diagonals – not quite stair-stepped as you might imagine.
Please click the images to view them at the correct size:
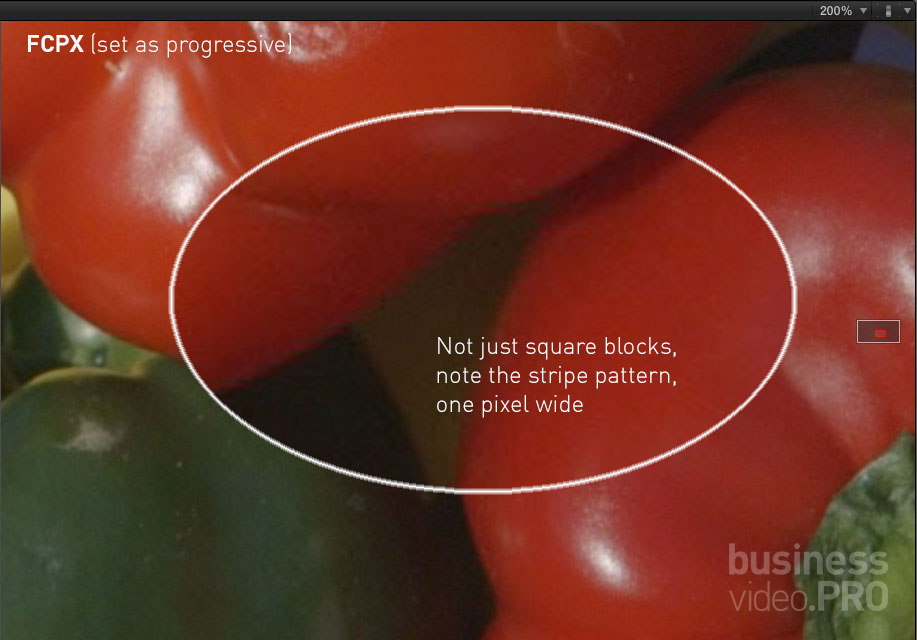
There are stripes at the edge of the red peppers, and their length denotes interframe movement. These artefacts illustrate that there’s some interlace going on even though the image is progressive.
Like ‘true’ interlacing artefacts, these stripey areas add extra ‘junk information’ which must be encoded and compressed when delivering video in web ready formats. These are wasting bitrate and robbing the image of crispness and detail. Reds are most affected, but these issues crop up in areas of strong chrominance including fabrics, graphics and stage/theatrical lighting.
Some have pointed the finger of blame at edit software, specifically Final Cut Pro X. I wondered if it was the way FCPX imported the .MTS files, so I rewrapped them in ClipWrap from Divergent Media. In version 2.6.7, I’ve yet to experience the problems I experienced in earlier versions, but the actual results seem identical to FCPX:
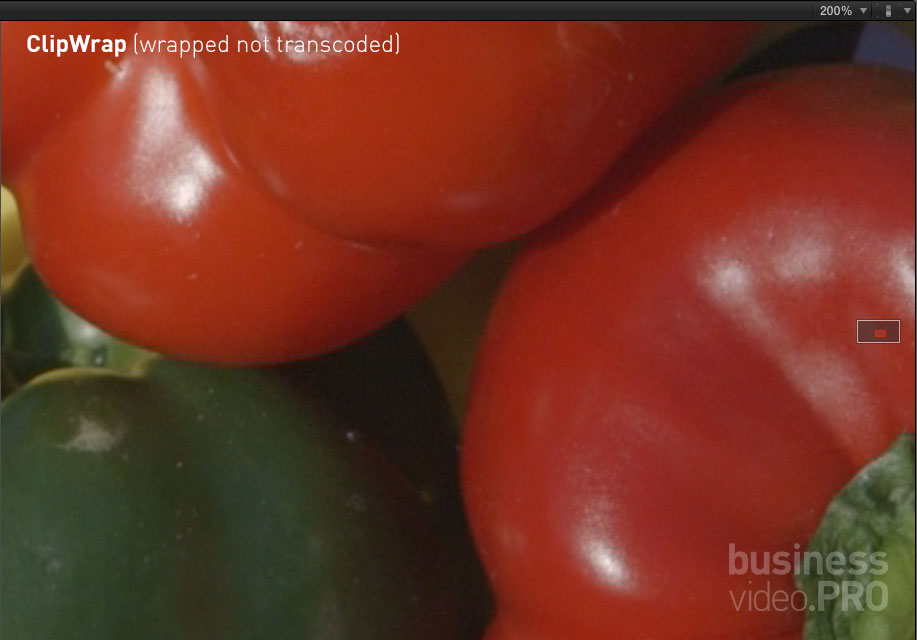
For the sake of completeness, I took the footage through ClipWrap’s transcode process – still no change:
![]()
So the only benefit would be to older computers that don’t like handling AVCHD in its natural state.
To isolate the problem to the recording format rather than the camera, I also shot this scene on an external recorder using the Canon’s 4:2:2 HDMI output and in recorded in ProRes 422HQ. The colour information is far better, but note the extra noise in the image (the C100 includes noise reduction for its AVCHD recordings to help the efficiency of its encoding).

This is the kind of image one might expect from the Canon C300 which records 4:2:2 in-camera at 50 Mbits per second. Adding an external recorder such as the Atomos Ninja matches the C300’s quality. But let’s say you don’t have the option to use an external recorder – can the internal recordings be fixed?
RareVision make 5DtoRGB – an application that post-processes footage recorded internally in the 4:2:0 based H.264 and AVCHD codecs, and goes one further step by ‘smoothing’ (not just blurring) the chroma to soften the blockiness. In doing so, it fixes the C100’s AVCHD chroma interlace problem:
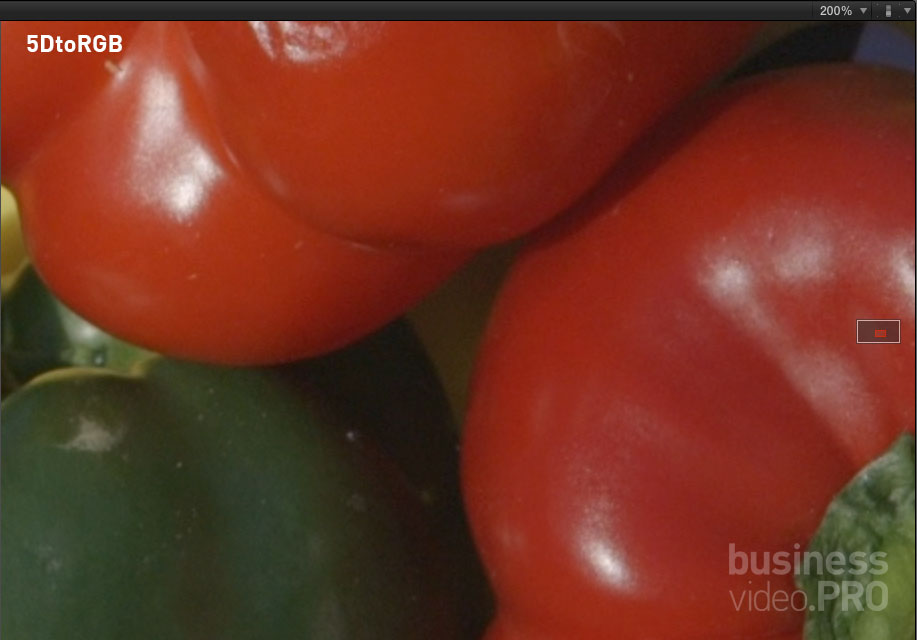
The results are a very acceptable midway point between the blocky (stripey) AVCHD and the better colour resolution of the ProResHQ. Here are the settings I use – I’ll do a separate guide to 5DtoRGB in a separate post.
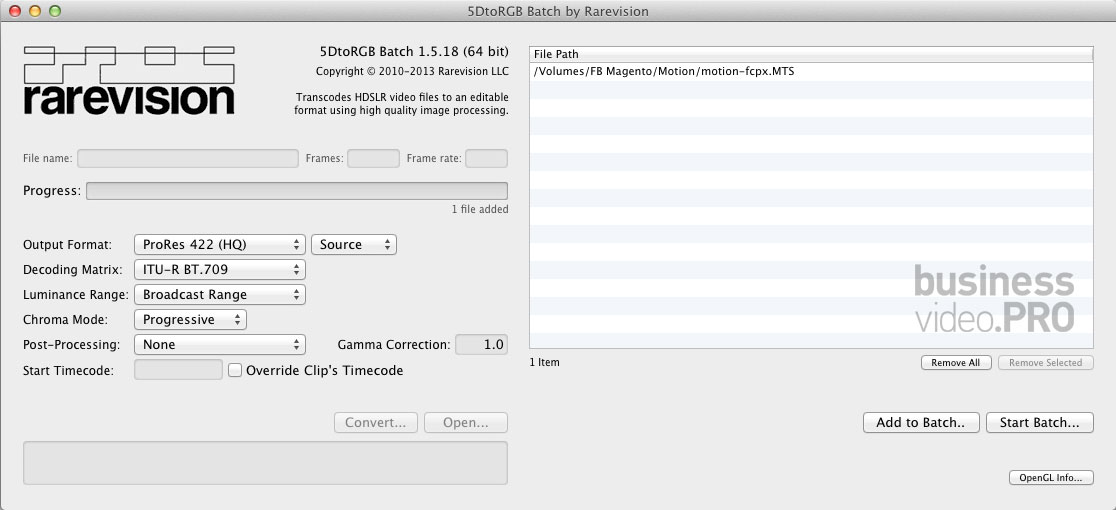
The only key change is a switch from BT.601 to BT.709 (the former is for US Standard Definition, the latter is for all HD material, a new standard is available for 4K).
So why should you NOT process all your C100 rushes through 5DtoRGB?
It takes time. Processing a 37 second clip took 159 seconds (2 mins 39 seconds) on my i7 2.3 GHz MacBook Pro. Compare that with 83 seconds for ClipWrap to transcode, and only 6 seconds to rewrap (similar to Final Cut Pro’s import).
You will have to judge whether the benefits of shooting internally with the significant transcode time outweigh the cost of an external recorder and the inconvenience of using it. You may wish to follow my pattern for the majority of my non-chromakey, fast turnaround work, where I’ll shoot internally, and only when I encounter difficult situations, opt to transcode those files via 5DtoRGB.
I’ve also been investigating the use of a ‘denoiser’. It’s early days in my tests, but I’ve noticed that it masks the ‘interlaced chroma’ stripe pattern is effectively hidden:

This is not a panacea. Denoising is even more processor intensive – taking a long time to render. My early testing shows that you can under- and over-do it with unpleasant results, and that the finished result – assuming that you’re not correcting a fault, but preparing for a grade – doesn’t compress quite as well. It’s too slick, and therefore perversely needs some film grain on top. But that’s another post.

Thanks for this. Rented a C100 to cover an event with a lot of red lighting, got lots of edge lines showing up in Final Cut X. Will try running Neat Video to see if it’s denoiser helps.
Saleem, do try using the Rarevision 5DtoRGB on your event footage, it will do a lot to repair the slightly unique C100 way of handling reds. Try it out – it may be worth re-ingesting the footage from the original source (or your backup of the cards). Denoising can help, but let’s get the footage buffed up first. LOL
In premiere pro cs6, I’ve found this to work, I’m not sure how, but it does…canon c100 mk ii
(Running premiere cs6 on a Mac)
Modify>Interpret footage>conform to no fields
THEN go to video effects>blur and sharpen>channel blur….
Throw it on your clip without adjusting anything and DONE!
Check out your reds and see if that works!
Neat Video would be for noise reduction – for edge issues from AVCHD footage, try 5DtoRGB to do your convert – or, as Shiloh Heyman suggests, you may want to look into Adobe Media Encoder. I’ve not really got on with AME due to its poorer quality on H.264 encodes (that’s encoders, Shiloh, not decodes – I prefer Episode driving the X264 encoder). But following his post I will dust it off and give it a try too.
Meantimes, 5DtoRGB does a visibly better job than FCPX.
It’s not interlacing. It is macro blocking on the red and blue channels. Apple’s QT H264 decoder does this to decrease the compute power needed to play back H264 video on their low power devices. It maintains full res in the green channel so its hard to detect when just watching the video but strip out the only full res channel (like when doing a green screen chroma key) and you’re left with some really ugly footage. Unfortunately they use the same decoder in FCP so all versions of FCP are flawed from their very foundation for working with H264 video. Even if you transcode to ProRes, the footage is still be decoded by their crap QT decoder in the process before it is re-coded to ProRes. The result is a ProRes file that is worse than the original H264 file because the artifacts are baked in and can never be removed. 5DtoRGB also does some undesirable “voodoo”. Want the best result from your footage for chroma key? Use Adobe or transcode your footage to ProRes using After Effects CC or Premiere Pro CC. Adobe stopped using the QT codecs for H264 a while ago (around CS5 I think) and licensed a proper H264 decoder for their products.
An interesting theory, which I’ll endeavour to test side by side.
But I’d be interested to know why this odd pattern of blocking (sawtooth shape) on the C100 footage is unique to the C100 – not, for example the Sony FS100 & FS700 AVCHD footage going through exactly the same workflow, nor the Panasonic AVCHD footage I’ve had before.
Hi Matt – Has there been any official explanation from Canon?
I bought a C100 recently (and a Ninja Blade), so I’ve got the option of using that.
Like you, I’m really curious as to why it does it or at what stage in the workflow it appears.
Thanks,
Steve
No response yet.
I think – but I may be wrong – that it’s part of the whole ‘interlace’ vs ‘PSF’ thing. I think the chroma of PSF is interlaced too, and not many apps can cope with that other than 5DtoRGB.
I must repeat – a lot of the time, I’m happy with the AVCHD and will put up with the rubbish that Canon have left us to deal with, but it’s just the reds and the high motion stuff (and to a lesser extent the chromakey) that keeps me plugging in the Ninja Pro as of late.
So for now, there’s a hierarchy: most of the time, just deal with AVCHD. Next level: process your AVCHD in 5DtoRGB. Highest level: shoot ProRes HQ to Ninja.
Thanks Matt,
I guess one way to confirm it would be to test static reds vs reds in motion.
My plan was to use the Ninja mostly anyway, I just think it’s a bit rotten for something in the EOS-C line.
Steve – reds in motion and reds as static? To me, in my inexpert and ham-fisted tests, look about the same. I think it’s the Canon implementation of AVCHD, as the C300 doesn’t exhibit this.
Yeah, I would have thought a static camera with a static red object might not show the problem if it was down to interlacing.
On the upside it’s possible to work around, on the downside a bit disappointing for a camera that costs that much.
I’m guessing that the video on Canon DSLRs don’t have this problem? Still 4:2:0 though.
LOL, don’t get me started about the Canon DSLRs – skin like clay, noisy darks, blacks that fall off a cliff, low detail, moire, yada yada yada. I don’t think they do this C100 issue because they don’t use AVCHD – they use an H.264 implementation in an MP4 wrapper.
A long time ago, Canon released the XLH1 – the HDV version of their venerable XL2 camera (which I actually rather liked). It had issues, but it also had problems like (surprise surprise) interlace/PSF issues and chroma problems.
Now, I’m not wanting to chuck poo at Canon through the cage bars, but I know how tempting it can be to ‘copy/paste’ code. So why are the AVCHD problems so very close to the HDV problems that the XLH1 had? ‘Hmm?’ (<– channelling Yoda)
Haha, yeah I’ve shot on a 7D and had an XH-A1, which seemed a bit of the baby brother to the XL-H1.
I’m looking forward to working with the C100, despite its quirks.
I have been using the C100 and editing on Premier Pro a fair bit and have had quite a few problems with de-interlacing, sequences slowing right down to a stutter, projects grinding to a close and problems with exporting. As a result I have been trying to find a decent workflow and suitable settings to make my working life easier. I would love to share any tips and tricks. Have you found a satisfactory workflow. Any advice would be much appreciated.
AVCHD can really tax computers that are older than 2 years (3 years if you bought high end). Furthermore, 8GB of RAM is enough for home movies, but it will tax a system used for pro video simply because it’s tempting to be importing footage, compressing footage and editing all at the same time.
Newer versions of the operating system also grab more resources, and so we’re chasing our tail unless you pickle your edit system and put up with whatever performance you can work with.
Converting AVCHD to ProRes is one step – larger resources, but easier to deal with for your computer. That’s where you can sort the interlacing issues once and for all. But that comes at the price of time and resources to do the conversion. If you can leave PPro/etc to crunch stuff overnight, I’ve found ProRes gets rid of the spinning beachball of death.
Working on SSD is a revelaiton. I have a Seagate GoFlex bus-powered Thunderbolt adaptor, and that is by far the best platform to edit on, but you need to have a watertight backup and archive plan as at some stage you must park that project on a spinning drive. It’s an ugly moment when you compare the fluidity of editing on SSD to the relative stickiness of a HDD.
A couple of questions for you Matt, after converting footage from C100 to ProsRes using 5DtoRGB, should i let FCP X transcode the media during import? Tried without doing so, and the media in the timeline keeps rendering all the time.
Hmm, FCPX shouldn’t need to transcode the footage you’ve got from 5DtoRGB. If you’re getting an orange bar, it would suggest to me that the Project is in a different format to your 5DtoRGB ProRes footage (e.g. it was expecting 29.97 and you’re feeding it 25fps, or – maybe more likely – it was expecting interlaced footage and you’re feeding progressive footage into the project).
Try this: create a new project, with Video Properties ‘Set based on first video clip’ and drop your 5DtoRGB footage on there. There should be no orange bars. Then you can compare your main project’s properties to this new one to see where it’s gone awry. 😉
Wow, quick response! Will try that. Thanks!
Hi Guys
Im having the same issue and have since reading this forum realised that it is indeed all of my red based footage that has the macro blocking (is this the correct term)?. I have also noticed that the footage looks so much better in PP however i mostly use FCPX for my work and find PP less intuitive. I have a few questions if thats OK?
Would shooting at 24p solve this issue. I’m pretty sure my workplace can accommodate the change in framerate on their playout devices which is Wings, Pro Presenter and iPad projector.
Could customising my WDR settings by adding Noise Reduction have made this worse?
Is there a programme that encodes like 5dtoRGB but to smaller files as Prores is far to big for my general workflow.
Is there a way of batch processing files in PP or Media encoder as they look so much better?
have been looking into transcoding to prores lite or proxy to save space but still fix issue, any thoughts? thanks so much guys
Hi Keith please try this simple fix that worked for me, I’d really like to know if it works with other peoples setup. Once your footage has been conformed to ‘progressive’ in premiere(from its interlaced wrapper) do a little zoom in to the monitor where the reds are doing their jagged edge artifacts. Then go to effects, choose blur and sharpen, then drag channel blur onto your clip. Keep all sliders on ‘0’, ie don’t adjust anything. Now, does that fix it?