Canon & Sony playing nice together

Photo: Sean Barnes

Producer, Shooter & Editor. Photo: Sean Barnes

After 5 days shooting a big banking expo in Boston, I’ve had loads of fun ‘camera spotting’.

Shooting at exhibitions is one of my main activities, and the mixture of run & gun, pack shots, interviews, talking heads and candid videography provides us with very strong opinions of what kit works well. Even down to choice of batteries or lighting stands. And what to wear. But I digress.

I saw big ENG cameras, little GH4s, loads of iPads (!) and even a brave soul with a tricked out Black Magic Cinema camera complete with beachtek audio interface, follow focus and matte box. It’s not the first time I’ve seen a BMCC used at a trade show, but to my mind it does take a bit of a leap of faith to wrestle one of these specialist cameras into service in such an unforgiving environment.

Expo shooting requires kit that doesn’t wear you down – you’ll be on your feet all day, and scooting from booth to booth. You don’t want to be weighed down by too many batteries, and you’ll need plenty of media. Plans change, things happen, and sudden opportunities crop up that might be missed if you need to change lenses or power up a complex camera. Everything has to be quick to deploy yet reach your expectations in picture and sound quality.

In many scenarios, you might not even have a secure base from which to keep bags, chargers and ‘special’ kit (long XLR and power cables for example). Suddenly, you’re in a sort of quasi-military mode, where you’re scooting around with the camera, a tripod, a lamp, some sound kit AND your backpack full of editing machine, hard drives, plus all the other bits and bobs you’ll need throughout the day. 12 kilometres per day with 40lb strapped to your back isn’t quite in Marines territory, but even so…

My go-to camera on these gigs has been the Sony EX1-R, and the magic addition of a spider dolly on the tripod – the little shopping trolley wheels. This enables you to scoot your camera and tripod around, whilst carrying an XLR cable, 416 stick mic and Sanken COS-11 lapel mic, headphones, batteries and water bottle in a ScottEvest ‘wearable office’.

Pretty much every videographer I meet looks at the spider dolly and immediately wants one. It truly adds so much value to your day’s work – and if the floor surface allows it, you can even get a few nice ‘dolly moves’ too – tracking shots, rotating around someone or something – though not all surfaces are up for it.

Due to the cost of carnets, shipping and so on, I rented my main camera from Rule Boston: a Sony PMW300. This is the replacement to the venerable Sony EX3, and bridges the gap between my EX1’s ‘little black sausage of joy’ design and a traditional shoulder mount ENG camera. I became very enamoured with the PMW300’s shoulder mounted ergonomics, thanks to its clever viewfinder design. The EVF is removable, unlike the EX3, so it can be packed into a airline carry-on bag or Peli case, with room for accessories, batteries, charger, etc.

It seemed to be almost a stop faster than the EX1, though I have not put them side by side. I didn’t seem to be using +3 and +6db gain as much as I do with the EX1, and shooting time-lapse outdoors with a 16 frame accumulation shutter actually required -3dB as I ran out of ND and didn’t want to go above f8 on the iris due to diffraction.

There was a little more heft than an EX1, but the pull-out shoulder pad and well placed EVF provided good balance and took some of the weight and strain off the right hand. All controls fell under my fingertips – it’s ‘just another Sony’ in that respect. Even though it was my first time with the camera, under stressful conditions, I was never hunting for controls or jacks. Switching between 1 mic at 2 levels, and two mics with independent level control, to mic plus line feed from mixing desk was simple and quick. I couldn’t say for sure if the mic pre-amps were better than the EX1-R, but I was never struggling with gain/noise even though expos are notorious for horrendous external noise.

There have been some changes to the menu structure, and flipping between ‘timelapse’ mode and ‘candid’ mode required a few more steps than I thought was necessary. Choosing the accumulation shutter requires a walk through all the available speeds rather than it remembering your settings and using a simple on/off toggle. Small point, but it makes a difference for operators in our game.

The PMW300 came with the K1 choice of lens – like the EX3, you can remove it and replace with a wide angle zoom or the new K2 option of 16x Funinon zoom. It doesn’t go any wider – just provides you with a little extra reach at the telephoto end. In the world of expo videography, wide angles are very valuable, though. Often you’re at such close proximity it’s hard to get the ‘scope’ of an expo booth, and as you pull back, your foreground fills with delegates.

This is why I brought my Canon C100 with me. It got a lot more use than I thought. I brought it primarily for talking heads and interviews – for that S35 ‘blurry background’ look with my 17-55 f2.8 and 50mm f1.4. In fact, most of the time, it wore my Tokina 11-16mm wide angle, which did wonderful things for the booth shots. Sony’s PMW Fujinon lens design has quite a bit of barrel distortion at the wide end, and I remember the ‘shock and awe’ of using the Tokina for the first time on my Canon 550D – very good distortion control and tack sharp.

We also had a few presentations to capture with two cameras – the C100 unmanned on the wide, whilst I operated the PMW300 on close-up. These setups were in dark, dingy and drearily lit ‘breakout’ rooms barely lit by overhead fluorescents. Absolutely no chance of extra lighting. This could have been a disaster with ‘panda eyes’ on presenters, but both the C100 and the PMW300 have gamma curves which really help in these circumstances.

This brings us neatly to another ‘trick’ – after all, we have two very different cameras from two separate manufacturers – how on earth are we going to match them?

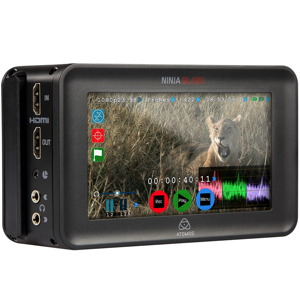
Whilst I probably wouldn’t want to attach the two to a vision mixer and cut between them live, I could get both cameras surprisingly close in terms of picture ‘look’ by using CineGamma 3 on the PMW300 and Wide Dynamic Range on the Canon. I also dialled in the white setting by Kelvin rather than doing a proper white set. The Canon’s screen cannot be trusted for judging white balance anyway – you need a Ninja Blade or SmallHD or similar trustworthy monitor for that. The Sony’s screen is a little better, but with a slight green tint that makes skin tones look a little more yellow than they appear on the recordings. I don’t mess with the colour matrix on either camera because you need trustworthy charts and constant access to a grade 1 or 2 monitor to do that – and this is where you’d be able to match both cameras for seamless vision mixing.

Suffice to say that in these circumstances, we need to achieve consistency rather than accuracy, so one simple colour correction on each camera will bring them both to a satisfactory middle ground. That’s how the Kelvin trick with the CineGamma 3 and WDR works. Neither are perfect ‘out of the box’ but they are sufficiently close to nudge a few settings and do a great match.

But once again, here’s another important learning point. Because we were creating a combination of Electronic Press Kits, web-ready finished videos and ‘raw rushes’ collections, our shooting and editing schedules were tight. We’d shoot several packages a day, some may be shot over a number of days. We didn’t have time for ‘grading’ as such. So bringing the Sony and the Canon together so their shots could cut together was very important.

The Canon C100’s highlights were sublime. Everything over 80IRE just looked great. The Sony’s CineGamma was lovely too, but the Canon looked better – noticeably better when you’re shooting ‘beauty’ shots of a booth mostly constructed out of white gauze and blue suede. The PMW300 did a great job, and really you wouldn’t mind if the whole job was captured on it, but the C100 really did a great job of high key scenes. Such a good job that I’d want to repeat the PMW300/C100 pairing rather than a double act of the PMW300 with a PMW200. If you see what I mean.

There was one accessory that we ‘acquired’ on-site that deserves a special mention. It’s something that I’ll try and build into similar shoots, and to any other shoots I can get away with. This accessory really added a layer of sophistication and provided a new kind of shot not necessarily seen in our usual kind of videos. The accessory is not expensive to purchase, but there are costs involved in transport and deployment.

This new accessory – this wonderful addition to any videographer’s arsenal of gizmos is… a ladder. Take any shot, increase the height of the lens by about a meter or so, and witness the awesomeness! Yes, you need (you really must have) a person to stand by the ladder, keep crowds away, stabilise it, be ready to take and hand over your camera, but… wow. What a view!

MacBook Pro 15″ Retina 2014 for FCPX

MacBook Pro 15” Retina Buyers remorse: I paid for extra GHz, should I have invested in a bigger SSD?

I’ve finally got my MacBook Pro 15″ 2014 BTO – I went for the 2.8 GHz processor which lead to a 12 day wait as it was shipped to the UK from Shanghai. Was it worth the wait? Did I get the best bang for the buck?

It replaces my Early 2011 MacBook Pro 17″ with 8GB RAM, which has been an excellent machine (with the £800 SSD option, quite frankly the most expensive Mac I’ve purchased), but it now has a dicky GPU and needs to be ‘baked’ now and then to reset it. That’s great as an ‘at-home’ machine, but not good ‘on location’. Hence the new machine.

According to the 64 bit Geekbench tests, the new 15″ MBP with 2.8 GHz processor is about 40% faster than the 2011 MBP17″, achieving GeekBench scores (and this is not a speed test, just a ‘run it and see’) of 3895/15215 over the MBP17″ 2866/10655. My previous upgrades have been stellar, but this was a bit, hmm – ‘okay’.

Lest we forget, my laptop is for editing first. However, it must also be my computer for everything else too.

I have been happy (ish) with a 500GB internal SSD that was super fast. I did no actual work on it (external SSD drives via Thunderbolt was the way to go), but apps did not ‘launch’ – they ‘decloaked’ – just appearing versus the wait and wait from an internal spinning hard drive. This was the big bonus – SSD for the system and apps is definitely the way to go. Do not consider anything less.

The biggest issue for us FCPX editors could be the lack of FW800 ports. I have >75 FW800 drives (mostly LaCie Quadras) and need to access their contents. So I used the BlackMagic Disk Speed Test app to measure performance ‘before and after’ – I already have a Belkin Thunderbolt dock to provide USB3 on my old MacBook, and I checked this out on the new MacBook too, as it could prove FW800.

So, the old MacBook Pro could do USB3 x3 ports on the Belkin Thunderbolt Dock. It could also do Firewire 800 and 1GB ethernet, whilst passing through the Thunderbolt connection to, say, my Black Magic UltraStudio Mini Monitor (HD-SDI output from Thunderbolt – yay!).

But what of the disk performance? The new MacBook Pro does USB3 natively (two ports) but can only do FW800 with a Thunderbolt adaptor, and that soaks up one valuable Thunderbolt port. No loop through. The Belkin does USB and FW800 – AND it has a Thunderbolt loop through.

Here’s my rough findings. These are not optimised results, they’re just what happens when I connect my various drives through the options I have available to me:

MBP15″ 2.8GHz (Read/Write)

  • Direct USB3 – 161W/165R
  • Dongled FW800 – 75W/72R (counterintuitive, but hey)
  • Belkin Dock FW800 – 68W/69R
  • Belkin Dock UBS3 – 94W/97R (that’s surprising)

but then two years ago I did similar tests on the OLD MBP17″ and…

  • Internal FW800 bus – 46W/44R
  • Internal USB2 bus – 32W/33R
  • Internal SSD eSATA – 88W/167R
  • CalDigit USB3 PCI ExpressCard – 96W/138R

So all my older FW800 drives happen to have USB3 interfaces, and I think I’ll be using THAT in the future. FW800 does appear to be dead in the water.

Okay, what these numbers do NOT say is the punch line. The internal SSD does the following – read and weep:

  • Internal SSD – 549W/726R

FCPX users, for the love of your favourite deity, invest in SSD not GHz. Partition your drive to two volumes – a working volume and a boot volume. The cost I had to bear for waiting for the extra GHz does not make a huge difference in the Geekbench scores. The difference of a 500GB scratch volume with those numbers is an immense kick up the backside cache.

Everything about the Mac OS, everything about the future of FCPX, is all about SSD. If you’re into mobile editing, if you’re into smaller projects with sub-10 minute timelines, invest in SSD, not GPU. I wish I’d doubled my SSD rather than get 15% more performance on the CPU.

Hot, dirty Macs

My somewhat senescent MacBook Pro 17” has been doing the ‘fainting goat’ thing recently. We’d be happily chugging away, then suddenly – freeze, black screen (or grey screen) of death – complete lock up. The screen’s backlight was still on (as shown by the glowing white Apple logo on the other side). Cycle the power, it would freeze on the grey screen after the Apple logo appears. But the grey screen was odd (not the moire from a bad iPhone snap – note the stripes!): strangescreen-2014-07-29-10-17.jpg If left for a few minutes (or longer), it would shut down. Powering up again brought everything back. If you held the power button down for >5 secs, it would power down but do the same thing. Hmmm. Clue.

Talks to some Apple dealer and repair folks sounded bad – ‘Graphics chip has gone’, ‘New motherboard’, and ‘bring it in and we’ll soak test it for a week.’ Well, it was happening two to five times a week. Not awful. Worth limping along whilst I decided what new MacBook Pro to buy.

Well, not so fast. I rather like my MacBook Pro – it has a 1920×1200 screen so does HD previews very well. It has a PCIe slot that’s the right size for my SxS cards from the EX1s – very convenient – and it has FW800 on it (I have over 80 FW800 drives). I therefore wanted it to live a little longer, if only to be a nice backup to a newer machine.*

The weather has been hot recently, so I wondered if that was at fault. I installed Temperature Gauge from Tunabelly Software, and this told me an interesting story. During background render tasks, things were getting very hot indeed. CPUs and GPUs would reach 100 degrees Celsius, but more to the point, the fans were pretty much running full pelt as soon as the Mac had something (anything) to chew on.

Sadly, when the Mac did its fainting goat, it wiped the log file for Temperature Gauge (this issue now fixed in v4.4.2), but it was pretty obvious what was going on. The Mac was getting super hot, and was cutting out. It wouldn’t reboot properly until it had cooled down. It dawned on me that this machine is over three years old, and it’s never had the air filters cleaned. I put a date in the diary to take it to MacDaddy to have it sorted (and some extra RAM whilst we were at it).

Then the British weather intervened – the office was getting very warm. The Mac started fainting several times a day even with a desk fan blowing on it, and something really had to be done. So armed with my smallest Phillips screwdriver, a little paintbrush and a vacuum cleaner, I decided to DIY. 10 screws later, and we were in. Pretty obvious once the back was off. Before and after: fans-2014-07-29-10-17.jpg intakes-2014-07-29-10-17.jpgtray-2014-07-29-10-17.jpg So, very easy process – should have done it sooner, wasn’t as bad as suspected.

UPDATE: I’ve been advised by dear friend Marcus Durham that using a vacuum cleaner nozzle close to electronics is not such a wise thing – apparently the air flow can cause static electricity build-up which can fry delicate electronics. Hence the standard recommendation of using clean compressed air (he advises doing this outside). I stand corrected.

Since the cleaning, the fans are running at much more sedate speeds and less often. Of course, when a really big render or encode chugs through, it does warm up quite a bit – but no 100 Degree alarms, no 6000 RPM fans.

And no crashes. No faints. No ‘grey screen of death’ with Paul Smith stripes on it. The MacBook Pro rides again!


* And only today have I noticed Apple have refreshed their MacBook Pro line with double the RAM and a few more cycles per second for a little less money all round. Joy!

Ingesting P2 for FCPX – some alternatives

I’ve had some bad luck with MXF ingest to FCP, the Canon C300 variety needed a bit of voodoo. This weekend, I’m playing with images of Panasonic’s P2 media, copied onto an NTFS formatted USB3 drive.

FCPX couldn’t see anything. It knew there was a P2 card there, just didn’t see anything. Okay, moving on.

I’ve recently ditched Adobe Creative Cloud for being too expensive to maintain for an FCPX editor, but I still kept Adobe CS6 as there are some things (Audition, Encore, Photoshop and Illustrator) that I need – if not the latest versions thereof.

So, surprise, surprise, Adobe Premiere Pro and Adobe Prelude could both see the P2 card. I started a Transcode from the MXF files to ProRes 422.

If we skip the issues that cropped up trying to make that happen reliably, I also fired up Final Cut Pro 7 – which has a ‘Log and Transfer’ mode that also saw the P2 card images and willingly imported them whilst transcoding to ProRes.

And here’s the catch: FCP7 did 90 mins of P2 rushes in about 45 minutes. Adobe Prelude did the same in about 90 minutes.

So, we’d expect the Prelude transcodes to be better than the FCP7 transcodes – it took longer, the software is newer. Stands to reason, right?

The two versions look visually identical. Flipping between them, there’s no visible difference.

We can take one version, import the second version and overlay it on the first version, then use the ‘Difference’ composite mode. It will highlight the difference between the two – supposedly identical – frames. What you get is a murky-black composition which tells you nothing. What you need to do is group the two together, then boost the contrast to buggery. One of the versions has a sort of ‘flicking’ nature. Maybe for a frame, maybe for a second or so. I lined up originals on top of each other to mark where the difference composite flicked, then examined each version with a waveform monitor. What you see is this:

Compare this frame:
unknown-2014-07-26-19-21.jpeg

With this frame:
unknown-2014-07-26-19-21.jpeg

You may have to do this side by side. It’s actually a big difference. Check out her hair.

The Adobe Media Encoder version has barely visible jumps in luminance. Barely visible on a monitor. but it’s about 1-2 IRE. The FCP7 Transcode versions do not. They are ‘cleaner’.

Yes, I obsess (!) about this – because I’m chromakeying the results, and ‘bumps’ in luminance can upset the keying settings.

So, I’d recommend FCP7 over Adobe for ingesting P2 cards for measurable speed and quality reasons. I wish FCPX would ingest P2 direct from disk, but my installation doesn’t work (it didn’t work with C300 for a while, until I found the fix).

So there you go. I know Adobe Media Encoder gets a good write-up, but in this case I have to hand it to FCP7. I wonder if I’m missing a secret folder for P2 ingest in FCPX?

Creative Cloud – a line item on our invoices?

Premiere Pro reads timecode, has a better chromakeyer than FCPX, and has a basic workflow that makes sense. There’s loads to love. But today, I have revoked my subscription to Creative Cloud, and am reverting to CS6. Why?

It turns out that I earn my income using FCPX. It’s the tool that effectively puts food in the mouths of my family and keeps a roof over our heads. The same can be said of Sony and Canon cameras, but by and large, I’m perceived as an editor, and an FCPX editor at that.

FCPX is very important to me, and changes to FCPX have a direct impact on my family. If I were a carpenter, and somebody changes the way my saws or hammers work, I am very interested in that and will abandon the ‘trend’ in favour of the ‘reliable’ in a heartbeat. I have Adobe software – Photoshop, Illustrator, Premiere and After Effects – for a backup plan, for clients who are not Mac-based. I use it very infrequently.

Okay, so Illustrator is great for getting a logo out of a downloaded PDF from a company’s annual report. I can isolate it, scale it, then use Photoshop to rasterise it, and the screenshots I obtained, ready for animation. Whilst I like the new selection tools for cutting things out of a background, I don’t use it as much as a Motion Graphics artist would. I just need PhotoShop, Illustrator and AfterEffects as special ‘Swiss Army Knife’ tools. That’s just CS6. Maybe even 5.5.

One exception is Audition – my audio editor of choice, far better than SoundTrack Pro, immediately usable unlike Logic et al. Can’t do without that – if only to apply my Izotope plug-ins for voice-overs and interviews, and repair bad location audio. But I digress.

So Adobe are closing the doors on the ‘grandfather’ deals – folks who signed up to Creative Cloud early on at a 50% discount. CC is now established, those deals are gone.

I have been told ‘if you don’t get value from the Creative Cloud deal, you’re either not working or use other software’.

Boggle!? (note the use of the interrobang)

I am a freelance video editor. I need to work with the right tool for the right job. I need to remain up to date with my skills. My main editor is FCPX because of the kind of work I do – short form (1-5 minute). I use Premiere Pro for paid work 4-6 times a year because it does Time Of Day code, and it’s the editor of choice for a couple of clients – if they hire me to deliver a final programme, we work in FCPX. If they want to edit it further, I work in Premiere Pro so they can take it further.

So, I own CS6. I will have to pay £47 per month to be ready to edit stuff for those four Premiere Pro clients. That’s £564 per annum, and I will see less value from that than I do from – for example – an additional prime lens for my C100, or a budget for good plug-ins for my existing software.

So, here’s the solution: Edit software as a line item.

If you require me – a freelance video editor/director – to edit in Adobe Premiere CC, I will add £77 as a line item to my invoice to cover the cost of the latest version of the software. It’s a line item. Adobe have raised the cost of ownership for people who are NOT exclusively Adobe based, and that cost must be passed on, otherwise I am subsidising Adobe. I, a freelance artisan editor/director, am subsidising a global conglomerate organisation that cares not for my business or my success.

I don’t get the value from the Adobe Creative Cloud subscription because I don’t have enough clients who DO get the Adobe Creative Cloud subscription. Most of my clients don’t give a fig which edit solution I use. At £24 per month (grandfathered-in rate) Adobe CC was an expense I could swallow. At £48 per month, I need to draw a line. Maybe your line is different. I need to invest in many things – hardware, software, storage, archive, backup – and to have a £50 hit per month on something that doesn’t deliver that value, it has to be chopped. Nothing personal, just business.

Adobe doesn’t care about freelancers who major in other platforms (FCPX or Avid). This isn’t hyperbole, just a business situation. There are more people that Adobe want to court who will pay, than there are ‘special cases’ like the freelance market. The Creative Cloud makes it a little more hard line, is all.

The Creative Cloud let me down a few times when I REALLY needed it. My confidence in it has been trashed. Maybe Adobe can work out a system where ‘limited use’ users can keep abreast of the current edition and use the Suite on paying jobs for a top-up fee. Maybe that’s what the £77 per moth ad-hoc rate is all about.

Either way, it’s a line item on my invoices.

MovieSlate – the editor’s friend

I’ve finally managed to get MovieSlate to work as a Corporate Video tool that actually adds value to the edit, rather than as a bit of ‘decoration’.

https://vimeo.com/96981025

It seems I’ve been doing a wave of 2-camera shoots recently, mostly interviews on PMW-EX1s. A simple hand clap or even a bit of lip sync on ‘plosives’ (vocalising consonants such as ‘p’ and ‘b’) is often all you’d ever need to bring the two shots into synchronisation.

The idea of using a clapperboard could be seen as a little ‘effete’ and pretentious. In fact, I’d tried a few iPhone/iPad versions and found that the visual and audio cues were out of sync anyway. So I have, sadly, scoffed at them for too long.

But, a while back, I was editing some 3-camera interviews shot by a colleague, and he’d used an iPad slating app that actually did something really useful. It blipped a few text fields just before the slate – only 2-3 frames per field of text, but it quite clearly labelled the interviewee. Wowzers! The idea of shot logs, production notes and so on seems to have faded into obscurity and as a Corporate Video editor, often all I get is a hard drive with obscure rushes on it.

I’ve seen this done, but the blipvert text dump was of Things I Did Not Need To Know – director, DoP name, production name, camera type and so on. What I wanted to know was ‘who is this, how is the name spelled, what do I put in the lower third caption’. The sort of info I often have to trawl Linked-in for at 3:00 in the morning just to check spellings or find a shorter job title.

So I dusted off my copy of MovieSlate and dug around its interface, trying to get it to behave the way I wanted to. There are LOTS of options buried in MovieSlate and they’re not all where you’d expect to find them. In fact, trying to bash things into shape and work out what should go where took the best part of an afternoon – but now we’ve got through a few jobs working with MovieSlate, I’m going to be using it whenever I can.

Removing my ‘editor’ hat and now thinking as a ‘shooter’, I’m really keen to deliver rushes to an editor/client stating that CH1: is the lavalier, CH2: is the 416 on a boom – I’ve had some stuff edited where the two tracks were treated as stereo. And I’ll label my 1-mic, 2-channel (CH2 -18dB lower) too. A seasoned editor would work all this out just by looking at it, but some folks can miss out on the particular whys and wherefores.

So, here’s a little review of MovieSlate – created because I find trying to explain something as if teaching helps solidify my experience of it.

https://vimeo.com/97065586

Chromakey lighting – the basics

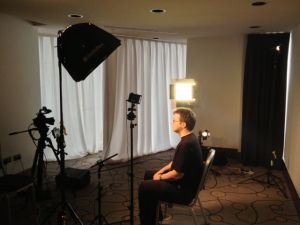
Alex Gollner and I were shooting some interviews in Berlin this week, and I inadvertently captured the last bit of our setting up which makes a neat little illustration of chromakey lighting. Our brief was to capture the corporate interviews that would fit a ‘white background’ look, but could also get rebranded, so we shot using a chromakey setup. 06 final key
This may surprise you, but that’s the result from the XDCAM-EX recording. It’s 4:2:0 and recorded internally at 8 bit to SDHC. It’s because the FCPX keyer is a ‘hybrid’ keyer that uses both colour and luminance info to create the key, but it can only work its magic if your source material is good. What does good look like?

First job is to ensure that the background is evenly lit, with no spill onto the subject. Evenness and correct exposure is very important to get a good quality result. The green should be around 50IRE-55IRE on a waveform monitor: 01 bgd lit, no light on subject Here, the Waveform Monitor shows the green background nudging towards the 60IRE line, but the key feature is that it’s flat (evenly lit) and the line is thin (not much variance from top to bottom).chromakey_wfm Next up, I used a daylight dichroic filter in my Dedo DLH4 backlight to give a cool effect, befitting a white background. Not too much to burn it out, just enough to ‘lift and separate’: 02 add backlight I didn’t feel that was enough, so I moved it a foot or so to the camera’s right. This made it more of a 3/4 back or ‘kicker’, catching Alex’s cheek. 03 move to threequarter back or kick Next, I added a very soft fill. It needed to be more of a ‘wash’ of light and something that could be carefully balanced with the key to provide the right level of ‘ambient’ lighting for a light background. If the fill were low, it would produce a high contrast look better suited to a dark background. We’re shooting for white, so another Dedo DLH4 was beamed into a big white reflector: 04 add fill Finally, I used a soft key – a small Dedo softbox with egg-crate – above head height. I really don’t like taking the key down to eye level as it looks unnatural. I don’t go too high, otherwise we lose the ‘tings’ in the eyes – the reflection of the light source in the iris that makes the interviewee look ‘alive’. 05 add soft key Once in Final Cut Pro X, it’s basically a case of dropping the Keyer plug-in onto the clip. I’ve nudged up the light wrap to create a little false flare around the edges, which introduces another little problem but really helps sell the shot. I’ve reframed accordingly. 06 final key

Conclusion:

Light your chromakey background first. Make sure it’s even and exposed correctly. Your subject should be untouched by the chromakey background lamps, and far enough away from the setup to avoid ‘spill’. Now you can light your subject with a thought to what background it will be used on. Lower contrast for bright backgrounds, higher contrast for dark backgrounds (just a rule of thumb). Update – our dear friend Sean Ebsworth Barnes was shooting stills on the same event and found us doing strange things –

MXF to FCPX not working? A possible fix

Ingesting C300 rushes using the Canon FCPX plug-in
Ingesting-C300-rushes-using-the-Canon-FCPX-plug-in
Canon provide a free plug-in to enable the C300’s MXF files to import directly into FCPX without the need to transcode to ProRes. Many users report that they have no problems with the installation and it ‘just works’. However, other users with similar setups report that they cannot import C300 rushes in FCPX, though it works through Log and Capture in FCP7, additionally Adobe Premiere successfully imports C300 MXF. Only FCPX seems affected, and for a limted subset of FCPX users.

C300 rushes don’t work
C300-rushes-don-t-work

Here’s the typical scenario: having run the xpfm211 installer. FCPX sees the folder structure, even the MXF files themselves, but does not recognise either. This is as far as some users get. For some reason, the installer has completed successfully, we are seeing files, but nothing imports. De-installing and re-installing brings the user back to this situation. Very frustrating.

After installing
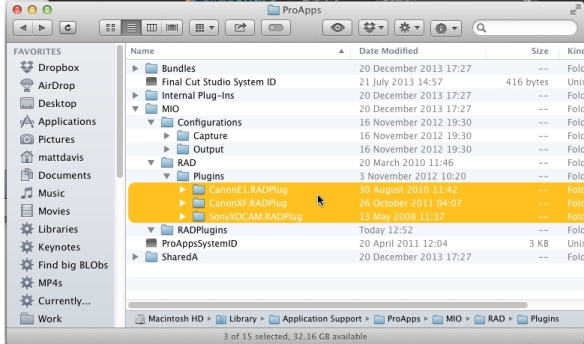
After-installingTrying to track the activity of the installer, we see two new plug-ins highlighted in the MIO/RAD/Plugins folder – CanonE1.RADPlug and CanonXF.RADPlug. The latter would appear to be the ‘magic smoke’ for the MXF format. However, this isn’t working. There’s a second empty RADPlugins folder below – should the plugins be in there?
Moving the plugins
Moving-the-pluginsWhilst it may seem a bit ‘cargo cult’ to shift the contents from a RAD/Plugins heirachy to a RADPlugins, it was worth a shot. No, it didn’t work.
Comparing folders with a working configuration
Comparing-folders-with-a-working-configurationHere’s where it got interesting. I was able to confer with another editor who had a system that did import MXF successfully. The key difference was that he had a CanonXF64.RADPlug folder – not an XF, an XF64. I could not find a similar folder, nor could I make the installer create one. In the end, he just sent me a copy of that folder, and I dragged and dropped it into the same folder I had.
C300 rushes now appear normally
C300-rushes-now-appear-normallyAnd it worked! It’s pretty obvious because you can see the clips, but also note that the MXF folder heirachy has gone, replaced simply with the usual list of clips on a card or archive.
The Secret Sauce of C300 Import
The-Secret-Sauce-of-C300-ImportSo this folder appears to be the missing link. Depending on your system, the installer either creates this folder, or it doesn’t. Both of us had the XDCAMFormat.RADPlugin, removing both did not make my installer create this file, the only way was to use somebody elses copy. It would be useful to provide this folder as a download to those who need it, but license agreements seem to forbid this sort of activity – probably for good reason.
It comes down to an issue with the installer, which isn’t written by Canon staff, and so it’s difficult to work out who to alert to the situation. However, as seen here, access to the CanonXF64.RADplug folder cures the problem for now.

Ninja Blade – 2:2 Pulldown with Canon C100 Fixed

ninjabladeUPDATE: 2:2 PULLDOWN FIXED IN AtomOS 5.1.1…
Early adopters frequently find little snags that are quickly patched, and this week is no different. I have taken delivery of the new Ninja Blade recorder last week.

It’s an awesome piece of kit for the C100 user – but when I record 25PsF, I noticed that the images are shifted two pixels to the left with a black line running down the right hand edge.

Atomos support are on the case have fixed it, they suggest we update to version 5.1.1 here. we keep the C100 set to 25PsF and set the Ninja Blade to 50i. In FCPX and Premiere (I don’t use Avid) simply do the 2:2 pulldown trick by treating it like AVCHD footage, manually switching the files from interlaced to progressive as described in PSF – the fix.

As a C100 user, I am very impressed by the Ninja Blade in a number of areas:

  • screen quality and fidelity with the option to calibrate
  • ability to use a LUT when shooting C-Log
  • audio meters that put the C100’s to shame
  • waveform monitor and vectorscope
  • shot logging features – both live and after the shoot

Combine all this with very low power consumption, a lightweight chassis and a wide range of media choices, it closes the gap between the C100 and C300.

I’ll do an in-depth review when I’ve cleared my current workload, and I’ll go into a bit of depth over the shot logging facilities which will really make a difference to shooting interviews and long form events such as presentations and conferences.

But not now. I really should be editing! Until then, remember the 50i to 25p trick.

UPDATE:

Well, it’s easy to deal with this little inconvenience in PAL-land. If you shoot in 24p or 23.976 PSF mode, you’ll find the same black line, so you’re recommended to shoot in 59.973 and you’re on your own.

So, whilst I don’t shoot for 24p or 23.976 most of the time,  when I shoot 29. 973 it’s fairly easy. So I had to find a solution that would make shooting 24p (or 23.976) work. It appears that the only way is to transcode the rushes. So…

With a drum roll and a nod to Abel Cine and all those who got there before me, here’s an Apple Compressor droplet that sorts your Ninja rushes out before you import them:

Apple Compressor Droplet.

C100 noise – the fix

The Canon C100 is an 8 bit camera, so its images have ‘texture’ – a sort of electronic grain reminiscent of film. Most of the time this is invisible, or a pleasant part of the picture. In some situations, it can be an absolute menace. Scenes that contain large areas of gently grading tone pose a huge problem to an 8 bit system: areas of blue sky, still water, or in my case, a boring white wall of the interview room.

Setup

Whilst we set up, I shot some tests to help Alex with tuning his workflow for speed. It rapidly became obvious that we’d found the perfect shot to demonstrate the dangers of noise – and in particular, the C100’s some-time issue with a sort of pattern of vertical stripes:

Click the images below to view the image at 1:1 – this is important – and for some browsers (like Chrome) you may need to click the image again to zoom in.

So, due to the balance of the lighting (couldn’t black the room out, couldn’t change rooms), we were working at 1250 ISO – roughly equivalent to adding 6dB of gain. So, I’m expecting a little noise, but not much.

Not that much. And remember, this is a still – in reality, it’s boiling away and drawing attention to its self.

It’s recommended to run an Auto Black Balance on a camera at the start of every shoot or if the camera changes temperature (e.g. indoors to outdoors). Officially, one should Auto Black Balance after every ISO change). An Auto Black Balance routine identifies the ‘static’ noise to the camera’s image processor, which will then do a better job of hiding it.

So, we black balanced the camera, and Alex took over the role of lit object.

There was some improvement, but the vertical stripes could still be seen. It’s not helped by being a predominantly blue background – we’re seeing noise mostly from the blue channel, and blue is notorious for being ‘the noisy weak one’ when it comes to video sensors. Remember that when you choose your chromakey background (see footnote).

The first thought is to use a denoiser – a plugin that analyses the noise pattern and removes it. The C100 uses some denoising in-camera for its AVCHD recordings, but in this case even the in-camera denoiser was swamped. Neat Video is a great noise reduction plug-in, available for many platforms and most editing software. I tried its quick and simple ‘Easy Setup’, which dramatically improved things.

But it’s not quite perfect – there’s still some mottling. In some respects, it’s done too good a job at removing the speckles of noise, leaving some errors in colour behind. You can fettle with the controls in advanced mode to fine tune it, but perversely, adding a little artificial monochrome noise helped a lot:

We noticed that having a little more contrast in the tonal transition seemed to strongly alter the noise pattern – less subtlety to deal with. I hung up my jacket as a make-shift cucoloris to see how the noise was affected by sharper transitions of tone.

So, we needed more contrast in the background – which we eventually achieved by lowering the ambient light in the room (two translucent curtains didn’t help much). But in the meantime, we tried denoising this, and playing around with vignettes. That demonstrated the benefit of more contrast – although the colour balance was hideous.

However, there’s banding in this – and when encoded for web playback, those bands will be ‘enhanced’ thanks to the way lossy encoding works.

We finally got the balance right by using Magic Bullet Looks to create a vignette that raised the contrast of the background gradient, did a little colour correction to help the skin tones, and even some skin smoothing.

The Issue

We’re cleaning up a noisy camera image and generating a cleaner output. Almost all of my work goes up on the web, and as a rule, nice clean video makes for better video than drab noisy video. However, super-clean denoised video can do odd things once encoded to H.264 and uploaded to a service such as Vimeo.

Furthermore, not all encoders were created equal. I tried three different types of encoder: the quick and dirty Turbo264, the MainConcept H.264 encoder that works fast with OpenCL hardware, and the open source but well respected X264 encoder. The latter two were processed in Epsiode Pro 6.4.1. The movies follow the above story, you can ignore the audio – we were just ‘mucking around’ checking stuff.

The best results came from Episode using X264

Here’s the same master movie encoded via MainConcept – although optimised for OpenGL, it actually took 15% longer than X264 on my MacBook Pro, and to my eyes seems a little blotchier.

Finally Turbo264 – which is a single pass encoder aimed at speed. It’s not bad, but not very good either.

Finally, a look at YouTube:

This shows that each service tunes its encoding to its target audience. YouTube seems to cater for noisy video, but doesn’t like strong action or dramatic tonal changes – as befits its more domestic uploads. Vimeo is trying very hard to achieve a good quality balance, but can be confused by subtle gradation. Download the uploaded masters and compare if you wish.

In Conclusion:

Ideally, one would do a little noise reduction, then add a touch of film grain to ‘wake up’ the encoder and give it something to chew on – flat areas of tone seem to make the encoding ‘lazy’. I ended up using Magic Bullet Looks yet again, pepping up the skin tones with Colorista, a little bit of Cosmo to cater for any dramatic makeup we may come across (no time to alter the lighting between interviewees), a vignette to hide the worst of the background noise, and a subtle amount of film grain. For our uses, it looked great both on the ProRes projected version and the subsequent online videos.

Here’s the MBL setup:

What’s going on?

There are, broadly speaking, three classes of camera recording: 8 bits per channel, 10 bits per channel and 12 bits per channel (yes there are exotic 16 bit systems and beyond). There are three channels – one each for Red, Blue and Green. In each channel, the tonal range from black to white is split into steps. A 2 bit system allows 4 ’steps’ as you can make 4 numbers mixing up 2 ‘bits’ (00, 01, 10 and 11 in binary). So a 2 bit image would have black, dark grey, light grey and white. To make an image in colour, you’d have red green and blue versions stacked up on top of each other.

8 bit video has, in theory, 256 steps each for red, green and blue. For various reasons, the first 16 steps are used for other things, and peak white happens at step 235, leaving 20 steps for engineering uses. So there’s only about 220 steps between black and white. If that’s, say, 8 stops of brightness range, then a 0.5 stop difference in brightness has only 14 steps between them. That would create bands.

So, there’s a trick. Just like in printing, we can diffuse the edges of each band very carefully by ‘dithering’ the pixels like an airbrush. The Canon Cinema range perform their magic in just an 8 bit space by doing a lot of ‘diffusion dithering’ and that can look gosh-darn like film grain.

Cameras such as the F5 use 10 bits per channel – so there are 1024 steps rather than about 220, and therefore handle subtlety well. Alexa, BMCC and Epic operate at 12 bits per channel – 4096 steps between black and white for each channel. This provides plenty of space – or ‘data wriggle room’ to move your tonality around in post, and deliver a super-clean master file.

But as we’ve seen from the uploaded video – if web is your delivery, you’re faced with 4:2:0 colour and encoders that are out of your control.

The C100 with its 8 bit AVCHD codec does clever things including some noise reduction, and this may have skewed the results here, so I will need to repeat the test with a 4:2:2 ProRes type recorder, where no noise reduction is used, and other tests I’ve done have demonstrated that NeatVideo prefers noisy 10 bit ProRes over half-denoised AVCHD. But I think this will just lead to a cleaner image, and that doesn’t necessarily help.

As perverse as it may seem, my little seek-and-destroy noise hunt has lead to finding the best way to ADD noise.

Footnote: Like most large sensor cameras, the Canon C100 has a Bayer pattern sensor – pixels are arranged in groups of four in a 2×2 grid. Each group contains a red pixel sensor, a blue pixel sensor and two green ones. Green has twice the effective data, making it the better choice for chromakey. But perhaps that’s a different post.