Having run a few C100 workshops now, here’s the long awaited ‘cheat sheet’ that lists what to tweak after a factory reset – and, of course how to save your settings BEFORE a reset:
It’s been updated for the Dual Pixel Auto Focus (DPAF) upgrade, and now covers two sides of A4 paper with some recommended button assignments and Custom Picture notes. Remember, this is only a starting point – you may wish to set up your Zebras differently, you may prefer a different peaking colour. However, there are lots of little things that should be checked before you reset your camera – and I do recommend doing just that with rented C100s.
One thing that didn’t quite make it to the cheat sheet is that because the video transport controls (Play/Pause, skip, fast forward and so on) are not active when in camera mode, they can be used as a sort of replacement for the joystick if you need to take the handgrip off and still use the menu system rather than pushbutton access to shutter, ISO, etc. I use a grip relocator if I need the C100 on a rig, and would strongly recommend it. But it’s good to have the option to control the camera completely without the grip attached.
I also have a cheat sheet in preparation for the C300, which I’ll endeavour to finish and test once I get some more quality time with one. In fact, there’s a number of things I’d like to revisit – I’m not entirely sure, but given a 1080p final result, I may actually prefer the 50i slomo trick over the 720p50 version, and need to shoot some charts in both modes.
Please feel free to share the link with your fellow C100 users – all I ask is that you use this link and don’t invent your own or download and republish, because if I need to update the document I can control the versioning with that link.
My somewhat senescent MacBook Pro 17” has been doing the ‘fainting goat’ thing recently. We’d be happily chugging away, then suddenly – freeze, black screen (or grey screen) of death – complete lock up. The screen’s backlight was still on (as shown by the glowing white Apple logo on the other side). Cycle the power, it would freeze on the grey screen after the Apple logo appears. But the grey screen was odd (not the moire from a bad iPhone snap – note the stripes!): If left for a few minutes (or longer), it would shut down. Powering up again brought everything back. If you held the power button down for >5 secs, it would power down but do the same thing. Hmmm. Clue.
Talks to some Apple dealer and repair folks sounded bad – ‘Graphics chip has gone’, ‘New motherboard’, and ‘bring it in and we’ll soak test it for a week.’ Well, it was happening two to five times a week. Not awful. Worth limping along whilst I decided what new MacBook Pro to buy.
Well, not so fast. I rather like my MacBook Pro – it has a 1920×1200 screen so does HD previews very well. It has a PCIe slot that’s the right size for my SxS cards from the EX1s – very convenient – and it has FW800 on it (I have over 80 FW800 drives). I therefore wanted it to live a little longer, if only to be a nice backup to a newer machine.*
The weather has been hot recently, so I wondered if that was at fault. I installed Temperature Gauge from Tunabelly Software, and this told me an interesting story. During background render tasks, things were getting very hot indeed. CPUs and GPUs would reach 100 degrees Celsius, but more to the point, the fans were pretty much running full pelt as soon as the Mac had something (anything) to chew on.
Sadly, when the Mac did its fainting goat, it wiped the log file for Temperature Gauge (this issue now fixed in v4.4.2), but it was pretty obvious what was going on. The Mac was getting super hot, and was cutting out. It wouldn’t reboot properly until it had cooled down. It dawned on me that this machine is over three years old, and it’s never had the air filters cleaned. I put a date in the diary to take it to MacDaddy to have it sorted (and some extra RAM whilst we were at it).
Then the British weather intervened – the office was getting very warm. The Mac started fainting several times a day even with a desk fan blowing on it, and something really had to be done. So armed with my smallest Phillips screwdriver, a little paintbrush and a vacuum cleaner, I decided to DIY. 10 screws later, and we were in. Pretty obvious once the back was off. Before and after: So, very easy process – should have done it sooner, wasn’t as bad as suspected.
UPDATE: I’ve been advised by dear friend Marcus Durham that using a vacuum cleaner nozzle close to electronics is not such a wise thing – apparently the air flow can cause static electricity build-up which can fry delicate electronics. Hence the standard recommendation of using clean compressed air (he advises doing this outside). I stand corrected.
Since the cleaning, the fans are running at much more sedate speeds and less often. Of course, when a really big render or encode chugs through, it does warm up quite a bit – but no 100 Degree alarms, no 6000 RPM fans.
And no crashes. No faints. No ‘grey screen of death’ with Paul Smith stripes on it. The MacBook Pro rides again!
* And only today have I noticed Apple have refreshed their MacBook Pro line with double the RAM and a few more cycles per second for a little less money all round. Joy!
Premiere Pro reads timecode, has a better chromakeyer than FCPX, and has a basic workflow that makes sense. There’s loads to love. But today, I have revoked my subscription to Creative Cloud, and am reverting to CS6. Why?
It turns out that I earn my income using FCPX. It’s the tool that effectively puts food in the mouths of my family and keeps a roof over our heads. The same can be said of Sony and Canon cameras, but by and large, I’m perceived as an editor, and an FCPX editor at that.
FCPX is very important to me, and changes to FCPX have a direct impact on my family. If I were a carpenter, and somebody changes the way my saws or hammers work, I am very interested in that and will abandon the ‘trend’ in favour of the ‘reliable’ in a heartbeat. I have Adobe software – Photoshop, Illustrator, Premiere and After Effects – for a backup plan, for clients who are not Mac-based. I use it very infrequently.
Okay, so Illustrator is great for getting a logo out of a downloaded PDF from a company’s annual report. I can isolate it, scale it, then use Photoshop to rasterise it, and the screenshots I obtained, ready for animation. Whilst I like the new selection tools for cutting things out of a background, I don’t use it as much as a Motion Graphics artist would. I just need PhotoShop, Illustrator and AfterEffects as special ‘Swiss Army Knife’ tools. That’s just CS6. Maybe even 5.5.
One exception is Audition – my audio editor of choice, far better than SoundTrack Pro, immediately usable unlike Logic et al. Can’t do without that – if only to apply my Izotope plug-ins for voice-overs and interviews, and repair bad location audio. But I digress.
So Adobe are closing the doors on the ‘grandfather’ deals – folks who signed up to Creative Cloud early on at a 50% discount. CC is now established, those deals are gone.
I have been told ‘if you don’t get value from the Creative Cloud deal, you’re either not working or use other software’.
Boggle!? (note the use of the interrobang)
I am a freelance video editor. I need to work with the right tool for the right job. I need to remain up to date with my skills. My main editor is FCPX because of the kind of work I do – short form (1-5 minute). I use Premiere Pro for paid work 4-6 times a year because it does Time Of Day code, and it’s the editor of choice for a couple of clients – if they hire me to deliver a final programme, we work in FCPX. If they want to edit it further, I work in Premiere Pro so they can take it further.
So, I own CS6. I will have to pay £47 per month to be ready to edit stuff for those four Premiere Pro clients. That’s £564 per annum, and I will see less value from that than I do from – for example – an additional prime lens for my C100, or a budget for good plug-ins for my existing software.
So, here’s the solution: Edit software as a line item.
If you require me – a freelance video editor/director – to edit in Adobe Premiere CC, I will add £77 as a line item to my invoice to cover the cost of the latest version of the software. It’s a line item. Adobe have raised the cost of ownership for people who are NOT exclusively Adobe based, and that cost must be passed on, otherwise I am subsidising Adobe. I, a freelance artisan editor/director, am subsidising a global conglomerate organisation that cares not for my business or my success.
I don’t get the value from the Adobe Creative Cloud subscription because I don’t have enough clients who DO get the Adobe Creative Cloud subscription. Most of my clients don’t give a fig which edit solution I use. At £24 per month (grandfathered-in rate) Adobe CC was an expense I could swallow. At £48 per month, I need to draw a line. Maybe your line is different. I need to invest in many things – hardware, software, storage, archive, backup – and to have a £50 hit per month on something that doesn’t deliver that value, it has to be chopped. Nothing personal, just business.
Adobe doesn’t care about freelancers who major in other platforms (FCPX or Avid). This isn’t hyperbole, just a business situation. There are more people that Adobe want to court who will pay, than there are ‘special cases’ like the freelance market. The Creative Cloud makes it a little more hard line, is all.
The Creative Cloud let me down a few times when I REALLY needed it. My confidence in it has been trashed. Maybe Adobe can work out a system where ‘limited use’ users can keep abreast of the current edition and use the Suite on paying jobs for a top-up fee. Maybe that’s what the £77 per moth ad-hoc rate is all about.
It seems I’ve been doing a wave of 2-camera shoots recently, mostly interviews on PMW-EX1s. A simple hand clap or even a bit of lip sync on ‘plosives’ (vocalising consonants such as ‘p’ and ‘b’) is often all you’d ever need to bring the two shots into synchronisation.
The idea of using a clapperboard could be seen as a little ‘effete’ and pretentious. In fact, I’d tried a few iPhone/iPad versions and found that the visual and audio cues were out of sync anyway. So I have, sadly, scoffed at them for too long.
But, a while back, I was editing some 3-camera interviews shot by a colleague, and he’d used an iPad slating app that actually did something really useful. It blipped a few text fields just before the slate – only 2-3 frames per field of text, but it quite clearly labelled the interviewee. Wowzers! The idea of shot logs, production notes and so on seems to have faded into obscurity and as a Corporate Video editor, often all I get is a hard drive with obscure rushes on it.
I’ve seen this done, but the blipvert text dump was of Things I Did Not Need To Know – director, DoP name, production name, camera type and so on. What I wanted to know was ‘who is this, how is the name spelled, what do I put in the lower third caption’. The sort of info I often have to trawl Linked-in for at 3:00 in the morning just to check spellings or find a shorter job title.
So I dusted off my copy of MovieSlate and dug around its interface, trying to get it to behave the way I wanted to. There are LOTS of options buried in MovieSlate and they’re not all where you’d expect to find them. In fact, trying to bash things into shape and work out what should go where took the best part of an afternoon – but now we’ve got through a few jobs working with MovieSlate, I’m going to be using it whenever I can.
Removing my ‘editor’ hat and now thinking as a ‘shooter’, I’m really keen to deliver rushes to an editor/client stating that CH1: is the lavalier, CH2: is the 416 on a boom – I’ve had some stuff edited where the two tracks were treated as stereo. And I’ll label my 1-mic, 2-channel (CH2 -18dB lower) too. A seasoned editor would work all this out just by looking at it, but some folks can miss out on the particular whys and wherefores.
So, here’s a little review of MovieSlate – created because I find trying to explain something as if teaching helps solidify my experience of it.
Alex Gollner and I were shooting some interviews in Berlin this week, and I inadvertently captured the last bit of our setting up which makes a neat little illustration of chromakey lighting. Our brief was to capture the corporate interviews that would fit a ‘white background’ look, but could also get rebranded, so we shot using a chromakey setup. This may surprise you, but that’s the result from the XDCAM-EX recording. It’s 4:2:0 and recorded internally at 8 bit to SDHC. It’s because the FCPX keyer is a ‘hybrid’ keyer that uses both colour and luminance info to create the key, but it can only work its magic if your source material is good. What does good look like?
First job is to ensure that the background is evenly lit, with no spill onto the subject. Evenness and correct exposure is very important to get a good quality result. The green should be around 50IRE-55IRE on a waveform monitor: Here, the Waveform Monitor shows the green background nudging towards the 60IRE line, but the key feature is that it’s flat (evenly lit) and the line is thin (not much variance from top to bottom). Next up, I used a daylight dichroic filter in my Dedo DLH4 backlight to give a cool effect, befitting a white background. Not too much to burn it out, just enough to ‘lift and separate’: I didn’t feel that was enough, so I moved it a foot or so to the camera’s right. This made it more of a 3/4 back or ‘kicker’, catching Alex’s cheek. Next, I added a very soft fill. It needed to be more of a ‘wash’ of light and something that could be carefully balanced with the key to provide the right level of ‘ambient’ lighting for a light background. If the fill were low, it would produce a high contrast look better suited to a dark background. We’re shooting for white, so another Dedo DLH4 was beamed into a big white reflector: Finally, I used a soft key – a small Dedo softbox with egg-crate – above head height. I really don’t like taking the key down to eye level as it looks unnatural. I don’t go too high, otherwise we lose the ‘tings’ in the eyes – the reflection of the light source in the iris that makes the interviewee look ‘alive’. Once in Final Cut Pro X, it’s basically a case of dropping the Keyer plug-in onto the clip. I’ve nudged up the light wrap to create a little false flare around the edges, which introduces another little problem but really helps sell the shot. I’ve reframed accordingly.
Conclusion:
Light your chromakey background first. Make sure it’s even and exposed correctly. Your subject should be untouched by the chromakey background lamps, and far enough away from the setup to avoid ‘spill’. Now you can light your subject with a thought to what background it will be used on. Lower contrast for bright backgrounds, higher contrast for dark backgrounds (just a rule of thumb). Update – our dear friend Sean Ebsworth Barnes was shooting stills on the same event and found us doing strange things –
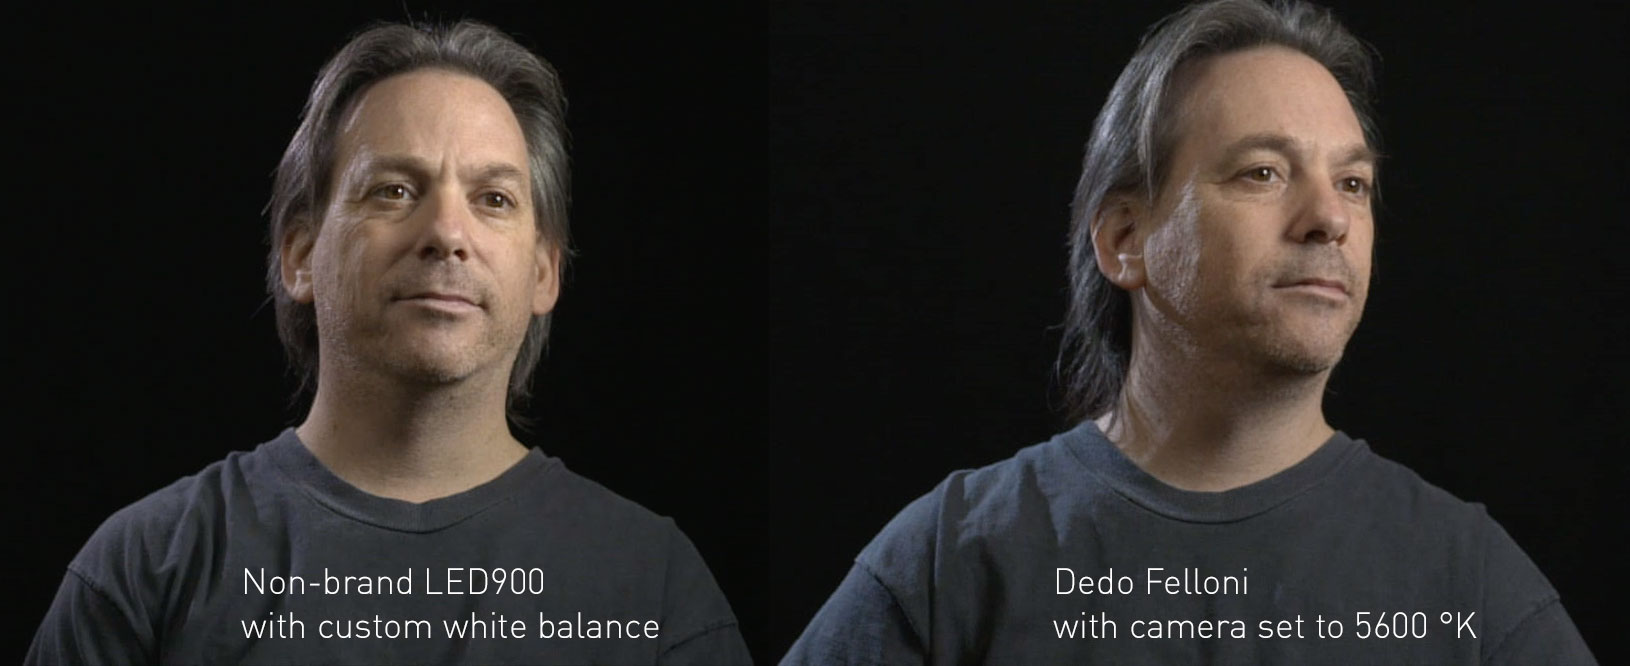
Many cameras allow us to dial in a specific colour temperature for a shot, rather than manually set it with a white or grey card. It sounds good, but can deliver alarming results.
Consider these two images shot under different lighting systems. In both cases, I’ve put a daylight Dedo DLED-4 over the shoulder as a sort of 3/4-backlight-kicker thing. It’s a look I like. That’s a fixed constant. I like to light to 4500 ºK which gives me wriggle room over colour temperature, and is a piece of cake with a bi-colour device like the Dedo Felloni. I had to shift the camera to 5600 to match the lighting sources with my cheaper LED panel lamps.
The camera was a Sony PMW F3 with Nikkor 35-70 at around f4.
Immediately, you can see that the Non-brand LED panels are green. Not just a little, green, they are Incredible Hulk Green. Note the daylight highlight on Rick’s temple – its about the same in both images, though I did use 5600 ºK on the F3 for the Non-brand LEDs. I tried using half CTO, but the results were absolutely hideous.
Both images are from LED sources and are untouched in terms of grading. The Fellonis are neutral, accurate and appear to all intents and purposes to be full spectrum. I also find the diffusion and fill tweaks to be particularly nice, considering the cramped location and speed at which we had to work.
So it’s plain: be careful of setting a colour temperature in-camera – it works well with continuous spectrum lighting, but looks horrible if you use more restrictive sources – especially LED devices from the lower end of our budget. They output a very restrictive light.
But that’s not the whole story.
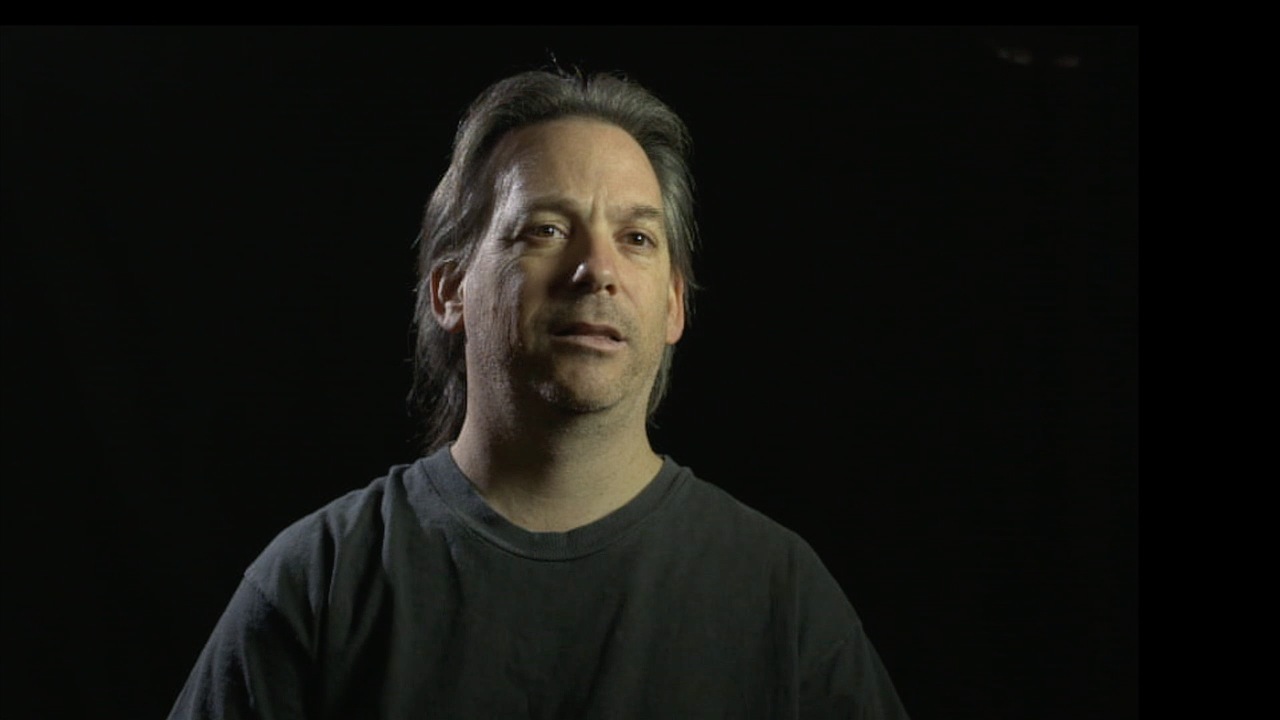
Let’s do what we’re supposed to do: let’s white-set on a known white reference (not just a bit of photocopier paper). Let’s re-light with our non-brand LED panels. At first glance, hey! It looks good!
Let’s compare with the more ‘continuous spectrum’ Fellonis on the right. Note that Rick’s skin tone on the left is far flatter with a hint of grey and yellow. Note also that the pure daylight source behind him is now casting a MAGENTA light over his hair and shirt – all that green has been neutralised, leaving a nasty Magenta odour hanging about. If we try and cancel that out, it will bring the green back in. Meanwhile, the brighter reds and oranges have been tempered by removing so much green.
The result? There’s an ashen look to the skin. It’s a bit dull. It lacks life. On the right, there’s some flush to the face around and under the eyes. The backlight and his shirt pick up the fresh daylight from the three-quarter back. It’s natural, rather than made up.
But bear in mind that if I were using the Non-brand LEDs in a mixed environment, trying to blend them with existing daylight or tungsten or – egad, even worse – both, the results are just awful. That green tinge is back, and it really doesn’t sit with anything else. I remember vividly a shoot trying to use these No-name panels in a mixed lighting situation, pinning half-CTO and diff over them to try and calm them, and still seeing the green tinge seep through.
Take home 1: be careful using pre-set Kelvin settings as not all lighting is full spectrum. You’re choosing a compromise. It can be the best decision, but it can also be wrong.
Take home 2: a proper white-set is the way to go in difficult situations, but strong corrections will impact other lighting sources (ambient, backlight, fill, etc)
Take home 3: Unless shooting raw, correcting for White Balance issues can only take away data from your image and reduce its quality.
Note: look out for the full story (and more) on moviemachine.tv soon.
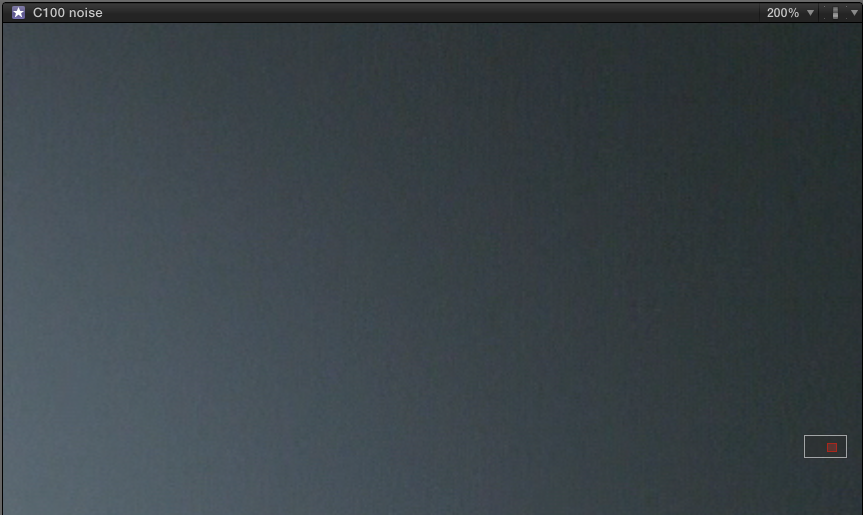
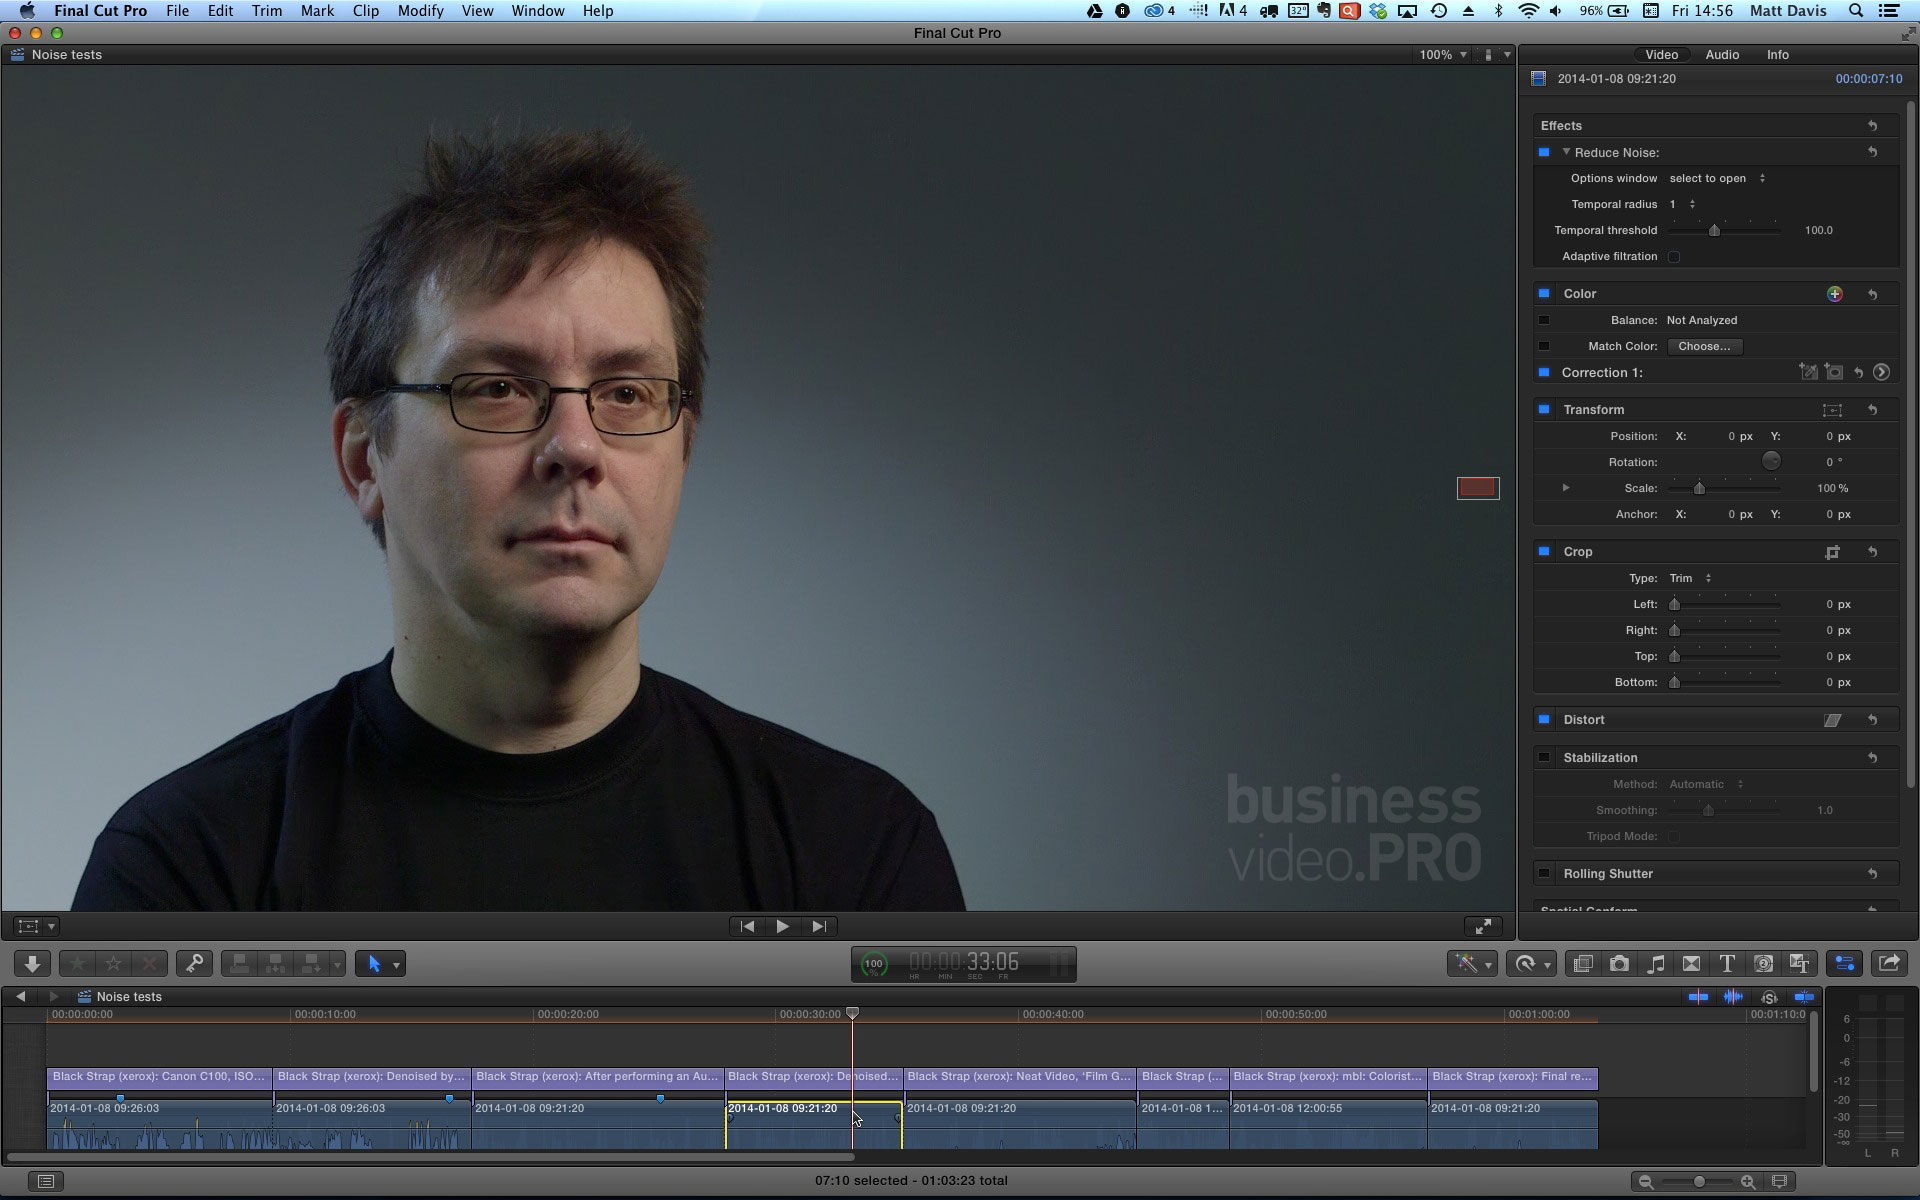
The Canon C100 is an 8 bit camera, so its images have ‘texture’ – a sort of electronic grain reminiscent of film. Most of the time this is invisible, or a pleasant part of the picture. In some situations, it can be an absolute menace. Scenes that contain large areas of gently grading tone pose a huge problem to an 8 bit system: areas of blue sky, still water, or in my case, a boring white wall of the interview room.
Whilst we set up, I shot some tests to help Alex with tuning his workflow for speed. It rapidly became obvious that we’d found the perfect shot to demonstrate the dangers of noise – and in particular, the C100’s some-time issue with a sort of pattern of vertical stripes:
Click the images below to view the image at 1:1 – this is important – and for some browsers (like Chrome) you may need to click the image again to zoom in.
So, due to the balance of the lighting (couldn’t black the room out, couldn’t change rooms), we were working at 1250 ISO – roughly equivalent to adding 6dB of gain. So, I’m expecting a little noise, but not much.
Not that much. And remember, this is a still – in reality, it’s boiling away and drawing attention to its self.
It’s recommended to run an Auto Black Balance on a camera at the start of every shoot or if the camera changes temperature (e.g. indoors to outdoors). Officially, one should Auto Black Balance after every ISO change). An Auto Black Balance routine identifies the ‘static’ noise to the camera’s image processor, which will then do a better job of hiding it.
So, we black balanced the camera, and Alex took over the role of lit object.
There was some improvement, but the vertical stripes could still be seen. It’s not helped by being a predominantly blue background – we’re seeing noise mostly from the blue channel, and blue is notorious for being ‘the noisy weak one’ when it comes to video sensors. Remember that when you choose your chromakey background (see footnote).
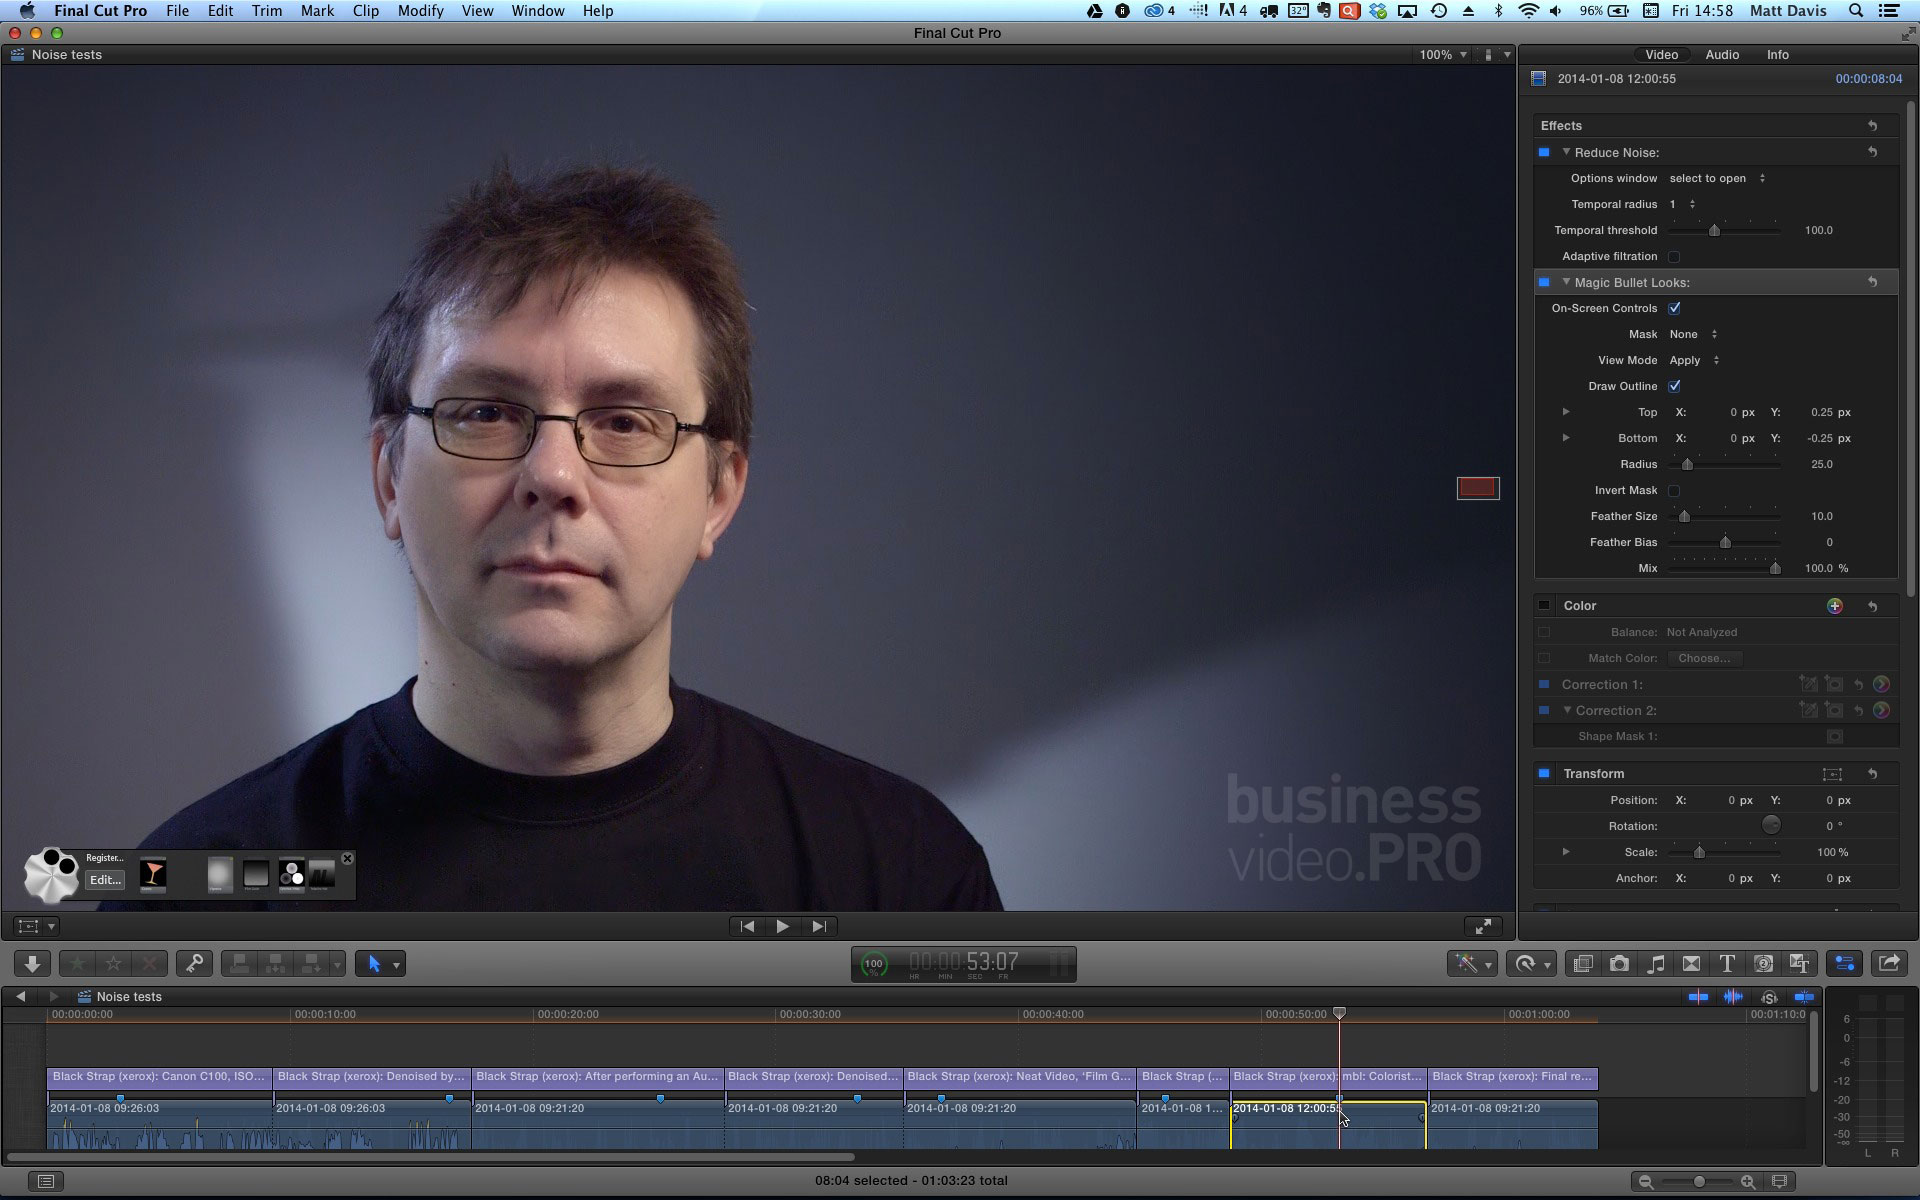
The first thought is to use a denoiser – a plugin that analyses the noise pattern and removes it. The C100 uses some denoising in-camera for its AVCHD recordings, but in this case even the in-camera denoiser was swamped. Neat Video is a great noise reduction plug-in, available for many platforms and most editing software. I tried its quick and simple ‘Easy Setup’, which dramatically improved things.
But it’s not quite perfect – there’s still some mottling. In some respects, it’s done too good a job at removing the speckles of noise, leaving some errors in colour behind. You can fettle with the controls in advanced mode to fine tune it, but perversely, adding a little artificial monochrome noise helped a lot:
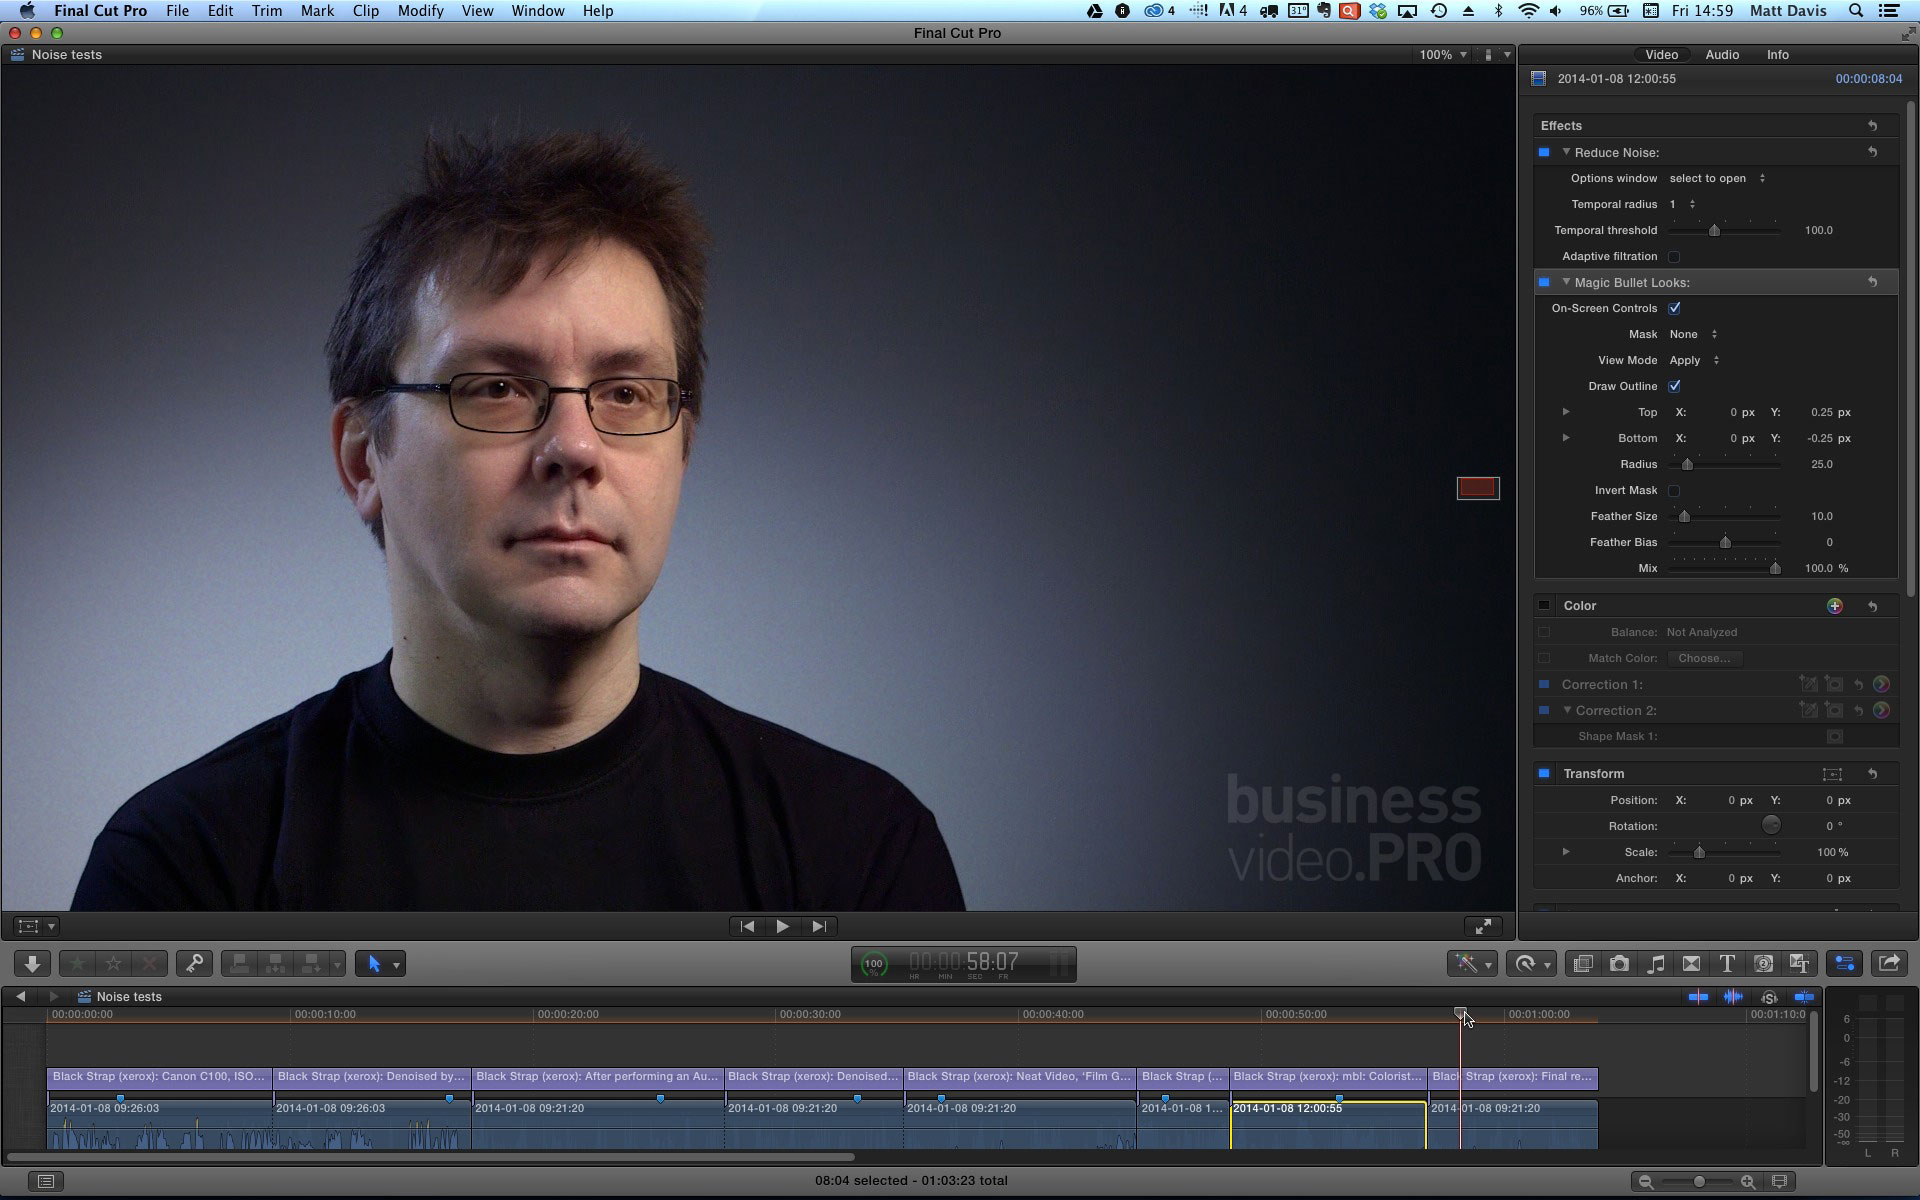
We noticed that having a little more contrast in the tonal transition seemed to strongly alter the noise pattern – less subtlety to deal with. I hung up my jacket as a make-shift cucoloris to see how the noise was affected by sharper transitions of tone.
So, we needed more contrast in the background – which we eventually achieved by lowering the ambient light in the room (two translucent curtains didn’t help much). But in the meantime, we tried denoising this, and playing around with vignettes. That demonstrated the benefit of more contrast – although the colour balance was hideous.
However, there’s banding in this – and when encoded for web playback, those bands will be ‘enhanced’ thanks to the way lossy encoding works.
We finally got the balance right by using Magic Bullet Looks to create a vignette that raised the contrast of the background gradient, did a little colour correction to help the skin tones, and even some skin smoothing.
The Issue
We’re cleaning up a noisy camera image and generating a cleaner output. Almost all of my work goes up on the web, and as a rule, nice clean video makes for better video than drab noisy video. However, super-clean denoised video can do odd things once encoded to H.264 and uploaded to a service such as Vimeo.
Furthermore, not all encoders were created equal. I tried three different types of encoder: the quick and dirty Turbo264, the MainConcept H.264 encoder that works fast with OpenCL hardware, and the open source but well respected X264 encoder. The latter two were processed in Epsiode Pro 6.4.1. The movies follow the above story, you can ignore the audio – we were just ‘mucking around’ checking stuff.
The best results came from Episode using X264
Here’s the same master movie encoded via MainConcept – although optimised for OpenGL, it actually took 15% longer than X264 on my MacBook Pro, and to my eyes seems a little blotchier.
Finally Turbo264 – which is a single pass encoder aimed at speed. It’s not bad, but not very good either.
Finally, a look at YouTube:
This shows that each service tunes its encoding to its target audience. YouTube seems to cater for noisy video, but doesn’t like strong action or dramatic tonal changes – as befits its more domestic uploads. Vimeo is trying very hard to achieve a good quality balance, but can be confused by subtle gradation. Download the uploaded masters and compare if you wish.
In Conclusion:
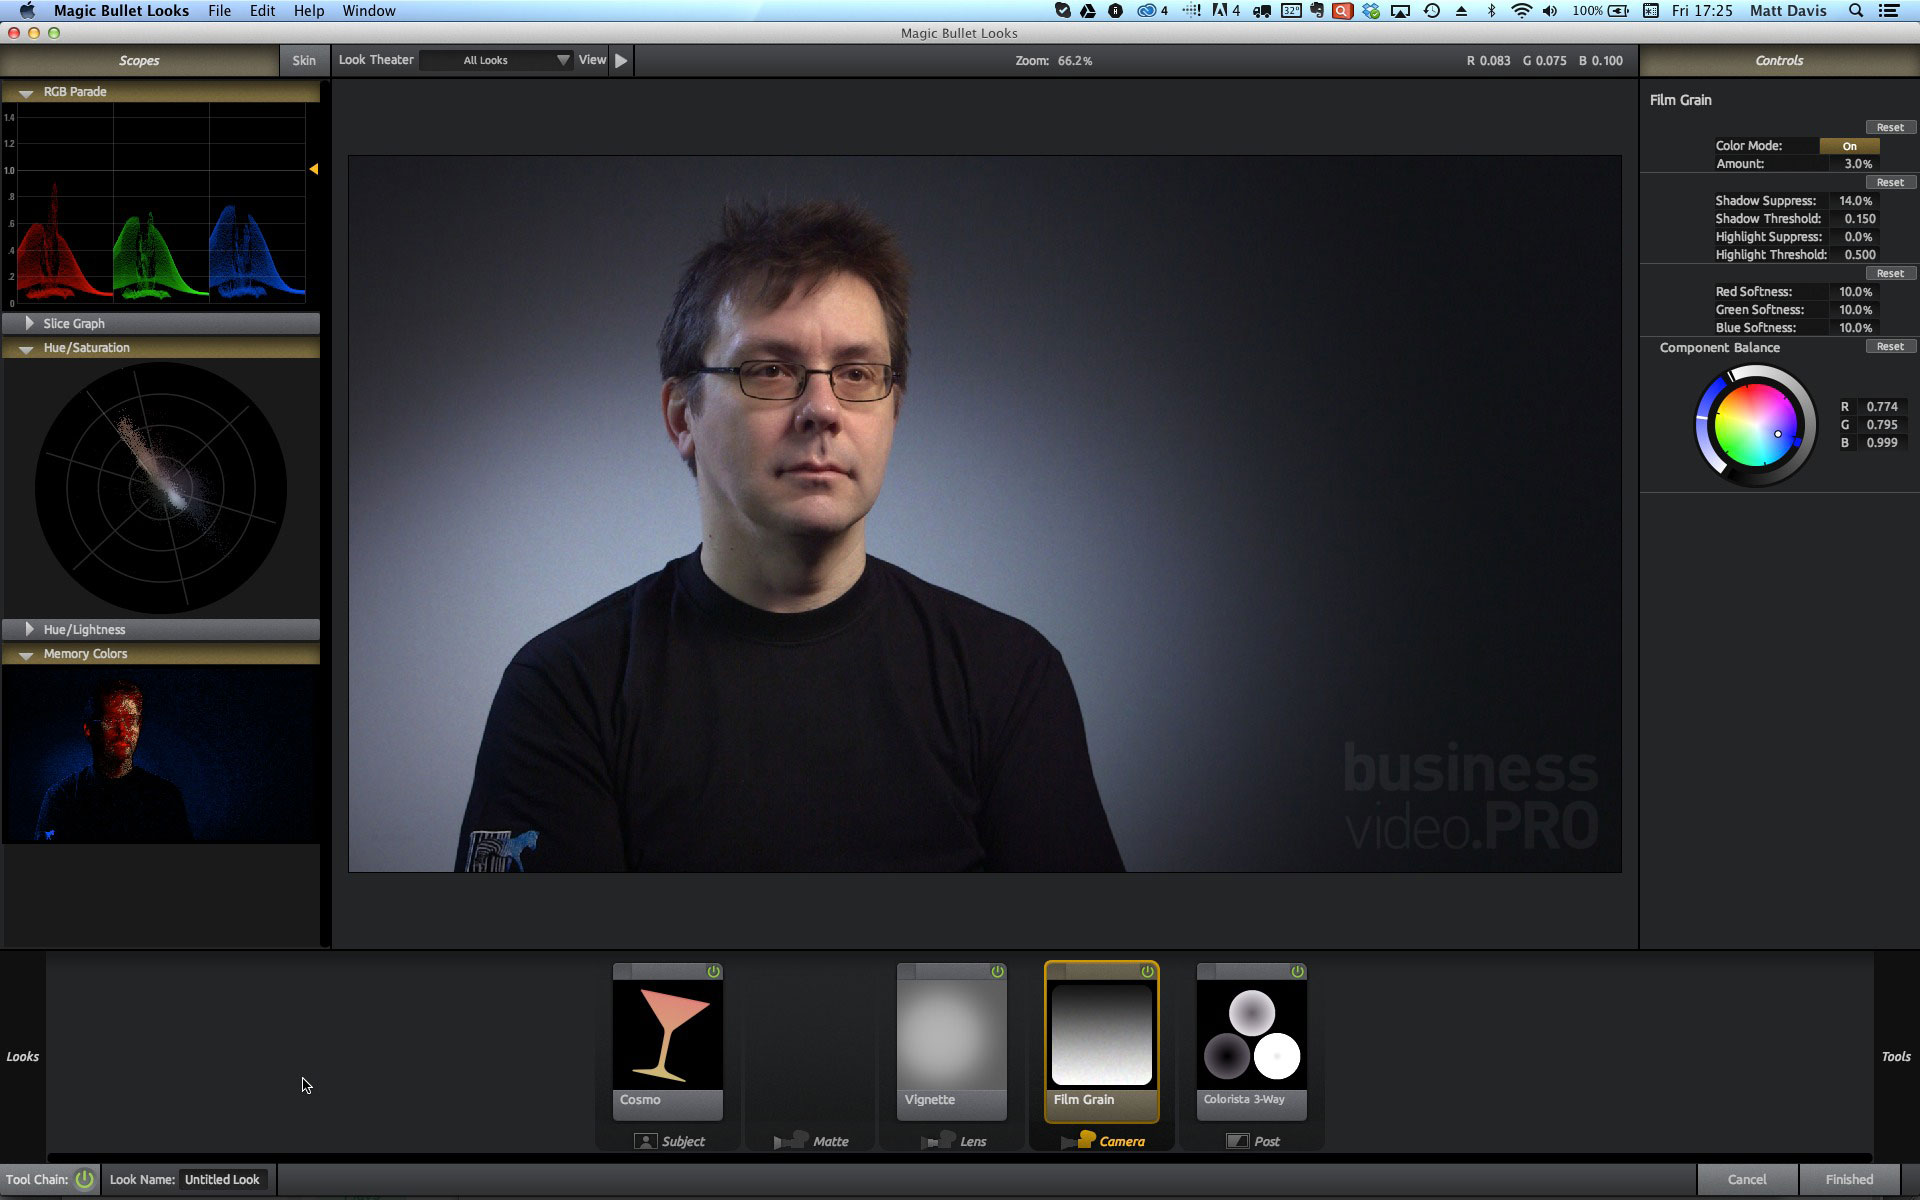
Ideally, one would do a little noise reduction, then add a touch of film grain to ‘wake up’ the encoder and give it something to chew on – flat areas of tone seem to make the encoding ‘lazy’. I ended up using Magic Bullet Looks yet again, pepping up the skin tones with Colorista, a little bit of Cosmo to cater for any dramatic makeup we may come across (no time to alter the lighting between interviewees), a vignette to hide the worst of the background noise, and a subtle amount of film grain. For our uses, it looked great both on the ProRes projected version and the subsequent online videos.
Here’s the MBL setup:
What’s going on?
There are, broadly speaking, three classes of camera recording: 8 bits per channel, 10 bits per channel and 12 bits per channel (yes there are exotic 16 bit systems and beyond). There are three channels – one each for Red, Blue and Green. In each channel, the tonal range from black to white is split into steps. A 2 bit system allows 4 ’steps’ as you can make 4 numbers mixing up 2 ‘bits’ (00, 01, 10 and 11 in binary). So a 2 bit image would have black, dark grey, light grey and white. To make an image in colour, you’d have red green and blue versions stacked up on top of each other.
8 bit video has, in theory, 256 steps each for red, green and blue. For various reasons, the first 16 steps are used for other things, and peak white happens at step 235, leaving 20 steps for engineering uses. So there’s only about 220 steps between black and white. If that’s, say, 8 stops of brightness range, then a 0.5 stop difference in brightness has only 14 steps between them. That would create bands.
So, there’s a trick. Just like in printing, we can diffuse the edges of each band very carefully by ‘dithering’ the pixels like an airbrush. The Canon Cinema range perform their magic in just an 8 bit space by doing a lot of ‘diffusion dithering’ and that can look gosh-darn like film grain.
Cameras such as the F5 use 10 bits per channel – so there are 1024 steps rather than about 220, and therefore handle subtlety well. Alexa, BMCC and Epic operate at 12 bits per channel – 4096 steps between black and white for each channel. This provides plenty of space – or ‘data wriggle room’ to move your tonality around in post, and deliver a super-clean master file.
But as we’ve seen from the uploaded video – if web is your delivery, you’re faced with 4:2:0 colour and encoders that are out of your control.
The C100 with its 8 bit AVCHD codec does clever things including some noise reduction, and this may have skewed the results here, so I will need to repeat the test with a 4:2:2 ProRes type recorder, where no noise reduction is used, and other tests I’ve done have demonstrated that NeatVideo prefers noisy 10 bit ProRes over half-denoised AVCHD. But I think this will just lead to a cleaner image, and that doesn’t necessarily help.
As perverse as it may seem, my little seek-and-destroy noise hunt has lead to finding the best way to ADD noise.
Footnote: Like most large sensor cameras, the Canon C100 has a Bayer pattern sensor – pixels are arranged in groups of four in a 2×2 grid. Each group contains a red pixel sensor, a blue pixel sensor and two green ones. Green has twice the effective data, making it the better choice for chromakey. But perhaps that’s a different post.
Turbo.264 HD by Elgato is a Mac application sold as a consumer solution to help transform tricky formats like AVCHD into something more manageable. Rather than deal with professional formats like Apple ProRes, it uses H.264, a widely accepted format that efficiently stores high quality video in a small space. For given values of ‘quality’ and ‘small’, that is.
For the professional video editor, a common requirement is to create a version of their project to be uploaded to the web for use in services like Vimeo and YouTube. Whilst this can be achieved in-app with some edit software, not all do this at the quality that’s required, and often tie up the computer until the process is complete. This can be a lengthy process.
So, enter Turbo.264 HD – a ‘quick and dirty’ compressor that can do batches of movies, gives you access to important controls of H.264 that are key to making Vimeo/YouTube movies that stay in sync and perform well. It’s very simple in operation. The following guide will help you make your own presets for use with Vimeo and YouTube.
First steps
Two Quicktime movies have been dropped onto the panel. Both are using custom presets created earlier. Click on the Format popup to select a preset, or add your own.
Vimeo/YouTube preset for Client Previews
Lots of presets have been built already in this copy of Turbo.264 HD – not just for the web but for iPad and iPhone use, even portrait (9:16) video. This guide will concentrate on two in particular.
Firstly, the Vimeo 720p version for client previews. This assumes that your master video will be in a high quality HD format such as 1080p ProRes, with 48KHz audio and progressive scan.
Clicking the ‘+’ button bottom left makes a new profile you can name. There’s a base Profile to work from that you select from the Profile pop-up at the top on the right hand side. For the Vimeo preset, the ‘HD 720p’ profile is used.
Next, adjust the settings as indicated. We don’t want to use the Upload service (as privacy settings may need indivual attention), the Audio settings can stay at automatic. The Other tab has basic switches for subtitles, chapters and dolby sound if they are part of the movie, and can be left alone.
Sending HD video via the internet
The second preset is useful when you need to send high quality material via the internet in an emergency. File formats such as ProRes are ideal for editing, but use a large amount of space. H.264 can incorporate very high quality in a much smaller file size, but the files are difficult to edit or play back in this state. However, they can be transcoded back to ProRes for editing.
The benefits and drawbacks of sending H.264 over ProRes
This preset does lower the quality by an almost imperceptible amount, and the original files should be sent via hard disk if possible. However when you need a quick turnaround under challenging circumstances (for example, a wifi internet connection in a hotel or coffee shop), this preset can help.
For example, a 2 minute 42 second ProRes clip uses 2.6 GB of disk space. The original clip shot on AVCHD at 1080p25 was 462 MB. However, using the H.264 settings below, the result was 101 MB with virtually no visible loss of quality. A 2 mbps internet connection would take almost 2.5 hours for the ProRes file, half an hour for the AVCHD file and under 7 mintues for the H.264 file.
And finally…
Hitting the start button starts the batch, and processed movies retain the original file name with a .mp4 extension. You can see that this 25fps 1080p movie is encoding at almost 28 fps, so a little faster than real time. The minutes remaining starts a little crazily then settles down. You can leave it running while you edit, but it will slow a little. When there’s no resizing and little compression, it can run twice as fast as real time (depends on the speed of your Mac).
Remember, this is just a quick and dirty method of turning around client previews quickly – I often have ‘batches’ to do, 6-12 movies of 3 mins each, or a couple of 20-30 min interview select reels with burned in timecode. I pump them all through Turbo264 rather than Episode Pro as – due to the high bitrate – you’re not going to see much difference.
When it comes to the final encode, a professional encoding solution such as Telestream Episode, with the X264 codec as a replacement H.264 encoder, will generate the best results.
They don’t really count as ‘television’ or ‘film’ – in fact they’re not much more than a moving photo or even diagram. But they are part of the mythos of the launch of a new technical product.
I’ve just finished my first one – and it was ‘official’ – no pressure, then.
I first watched quite a few unboxing videos. This was, mostly, a chore. It was rapidly apparent that you need to impart some useful information to the viewer to keep them watching. Then there was the strange pleasure in ‘unwrapping’ – you have to become six years old all over again, even though – after a couple of decades of doing this – you’re more worried about what you’re going to do with all the packaging and when you can get rid of it.
So… to build the scene. My unpack able box was quite big. Too big for my usual ‘white cyclorama’ setup. I considered commandeering the dining room, but it was quite obvious that unless I was willing to work from midnight until six, that wasn’t going to happen. I have other work going on.
So it meant the office. Do I go for a nice Depth of Field look and risk spending time emptying the office of the usual rubbish and kibble? Or do I create a quiet corner of solitude? Of course I do. Then we have to rehearse the unpacking sequence.
Nothing seems more inopportune than suddenly scrabbling at something that won’t unwrap, or unfold, or not look gorgeous. So, I have to unwrap with the aim of putting it all back together gain – more than perfectly. I quickly get to see how I should pack things so it unpacks nicely. I note all the tricks of the packager’s origami.
So, we start shooting. One shot, live, no chance to refocus/zoom, just keep the motion going.
I practice and practice picking up bundles of boring cables and giving them a star turn. I work out the order in which to remove them. I remember every item in each tray. Over and over again.
Only two takes happened without something silly happening – and after the second ‘reasonable’ take, I was so done. But still, I had to do some closeups, and some product shots. Ideally, everything’s one shot, but there are times when a cutaway is just so necessary, and I wish I got more.
Learning Point: FIlm every section as a cutaway after you do a few good all-in-one takes.
Second big thing, which I kinda worked out from the get-go. Don’t try and do voiceover and actions. We’re blokes, multitasking doesn’t really work. It’s a one taker and you just need to get the whole thing done.
Do you really need voiceover, anyway? I chickened out and used ‘callout’ boxes of text in the edit. This was because I had been asked to make this unboxing video and to stand by for making different language versions – dubbing is very expensive, transcription and translation for subtitles can be expensive and lead to lots and lots of sync issues (German subs are 50% more voluminous than English subtitles and take time to fit in).
So, a bunch of call-out captions could be translated and substituted pretty easily. Well, that’s the plan.
Finally, remember the ‘call to action’ – what do you want your viewers to do having watched the video? Just a little graphic to say ‘buy here’ or ‘use this affiliate coupon’ and so on. A nod to the viewer to thank them for their attention.
And so, with a couple of hundred views in its first few hours of life, it’s not a Fenton video, but it’s out there stirring the pot. I’d like to have got more jokes and winks in there, but the audience likes these things plain and clear. It was an interesting exercise, but I’m keen to learn the lessons from it. Feedback welcomed! What do you want from an Unboxing Video?
Looks like I’m in the market for a couple of dead cats for my stick mics.
Interesting feedback from filming voxpops this week – especially from the women. I paraphrase only slightly:
“Why isn’t yours fluffy? I don’t like that one, it’s to black and stubby. I want one I can stroke. Don’t point that at me, it’s not nice.”
Now, on a minor technical point, stuffing your 416 or CS-1 in a dead cat when indoors is a technical faux-pas. An audio tautology. When you see it happen, you think ‘Film Students’, or a gauche attempt to appear ‘Pro’. Whilst we can discuss the use of a Sennheiser 416 indoors over more suitable short shotgun microphones on one hand, and chuckle at the sort of gut reactions above on the other, I’m a bit shamed to be honest.
I’ve never really thought of the situation from the voxpopper’s position – specifically, someone who isn’t used to the gear we use. We call them ‘gun’ mics, ‘rifle’ mics, it’s all a bit wrapped in that male viewpoint, and when somebody pokes something ever so slightly alien at you, resplendent in its anodised smooth black metal, it can be… well, intimidating.
It can also be confusing. I didn’t have a ‘reporter mic’ with me when we suddenly had a need to do a ‘friendly chat’ between three people, so the participants (to some degree media trained) took my short shotgun Sanken CS1 (crumbs, here we go again) and used it like more like a vocalist’s mic (close to the mouth), to a degree where the mic was dealing with uncomfortably loud source material (never mind the audio circuits in the camera). The next participant would take over and use the mic at the correct distance for a reporter mic. Lots of scrabbling with audio levels, application of limiter in camera and compression in post rescued the shoot.
But I digress. The learning point from that is that, given a mic, media-trained folk will tend to shove reporter mics in people’s faces (including their own) ‘just like on TV’. But there is a sort of mic they KNOW should be wafted out of shot – that’s right, the big fluffy ones. You really can’t stuff that in somebody’s face.
So, here’s the deal. I will get a ‘Dead Cat’ windjammer for my hypercardiod (okay, short shotgun) mics when doing voxpops and accept a little less from them. Yes, it’s funny and unnecessary and to techie crews, ‘poserish’ – but it’s also funny for the interviewee, and that relaxes them. And they’ll keep the mics away from their face.

 Having run a few C100 workshops now, here’s the long awaited ‘cheat sheet’ that lists what to tweak after a factory reset – and, of course how to save your settings BEFORE a reset:
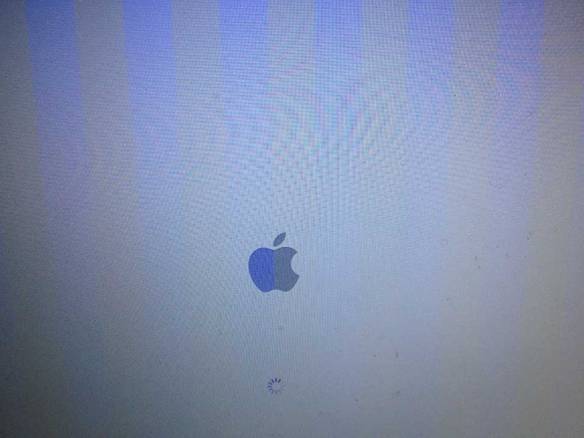 If left for a few minutes (or longer), it would shut down. Powering up again brought everything back. If you held the power button down for >5 secs, it would power down but do the same thing. Hmmm. Clue.